Sharing Deep Learning Research Models with Lightning Part 2: Leveraging the Cloud
In this article, we will deploy a Super-Resolution App on the cloud using the Lightning framework. The primary goal here is to see how easy it is to create and share a research demo. However, the cloud is for more than just model sharing: we will also learn how we can tap into additional GPU resources for model training.
- Sharing Your Research
- Lightning App Recap
- Running a Research Demo on the Cloud
- Configuring the Cloud: Choosing Files and Resources
- Training a Model on the Cloud
- Bonus: A More Sophisticated PyTorch Lightning Training App
- Next: Developing Custom Components
Sharing Your Research
I still remember the excitement when I started my research career as a graduate student. It was this time when GitHub had just emerged as a new platform for sharing your code. This was amazing and opened up so many opportunities for code sharing and collaboration.
Fortunately, more and more people have started sharing their code alongside their research papers over the last couple of years. Also, many researchers now provide easy-to-use Python scripts or Jupyter notebooks alongside their experiment pipelines.
However, it is 2022, and while I think that GitHub is still the primary way to share research code, it is about time to add another dimension to make our research stand out: Interactive Apps that we can share with others. Many years ago, I wrote a book chapter on how to do this with Flask, but this approach is antiquated and does not scale well beyond simple research demos. Also, who has the time to deal with infrastructure?
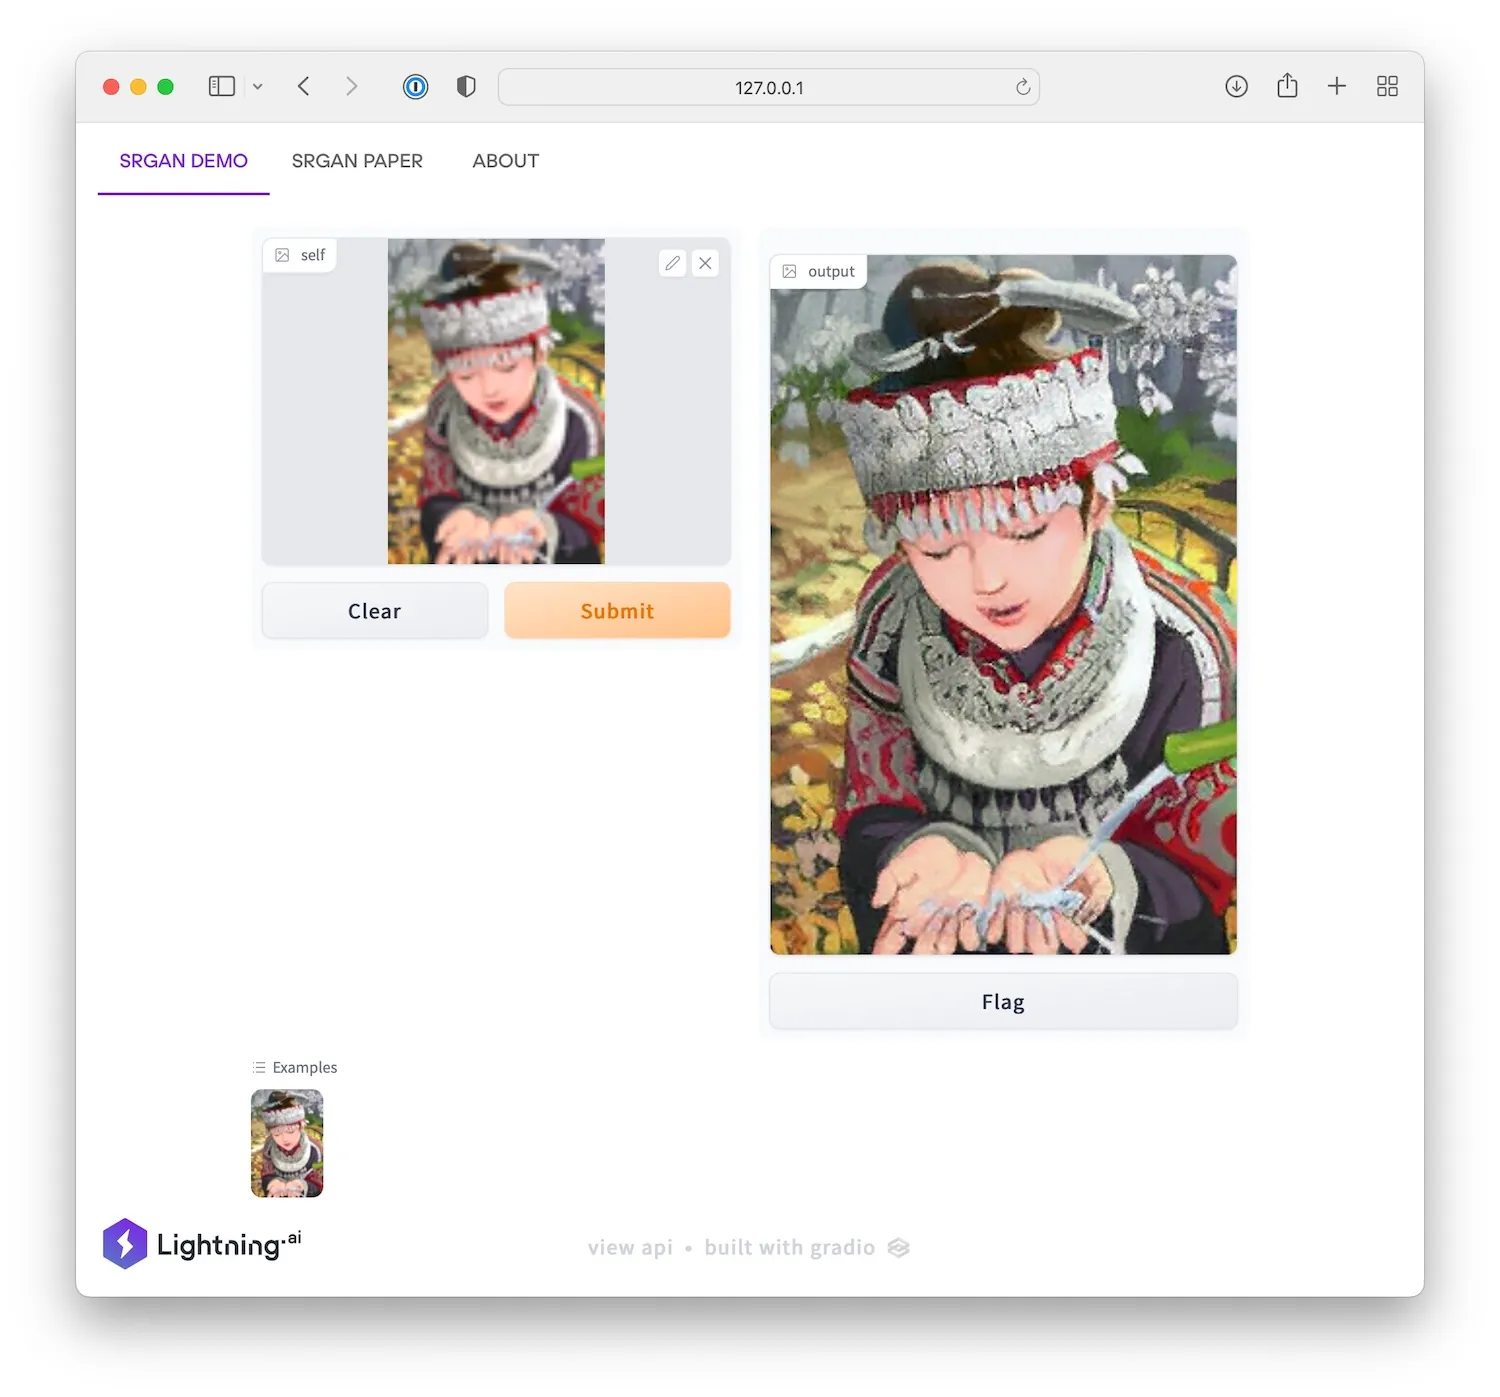
So, let’s take the Super-Resolution App we developed in Part 1 and run it on the cloud.
Lightning App Recap
In Part 1, we created and ran our first Lightning App locally. This was primarily meant as an exercise to understand the core API: LightningApp, LightningFlow, and LightningWork. If you don’t want to reread Part 1, I don’t blame you. Below is a short summary of the main ideas. (If you are well familiar with Part 1, please feel free to skip ahead to the next section.)
Lightning Apps consist of a main LightningFlow (the Root Flow) that orchestrates LightningWork and other LightningFlow (Child Flow) components. The Flows are for orchestration, whereas the =Works are usually for heavy lifting – that is, any substantial computation that takes more than a fraction of a second. Besides having a Root Flow, we are free to organize the component tree in any way we like. The only restriction is that the Work components have to be the terminal nodes, as shown in the figure below:
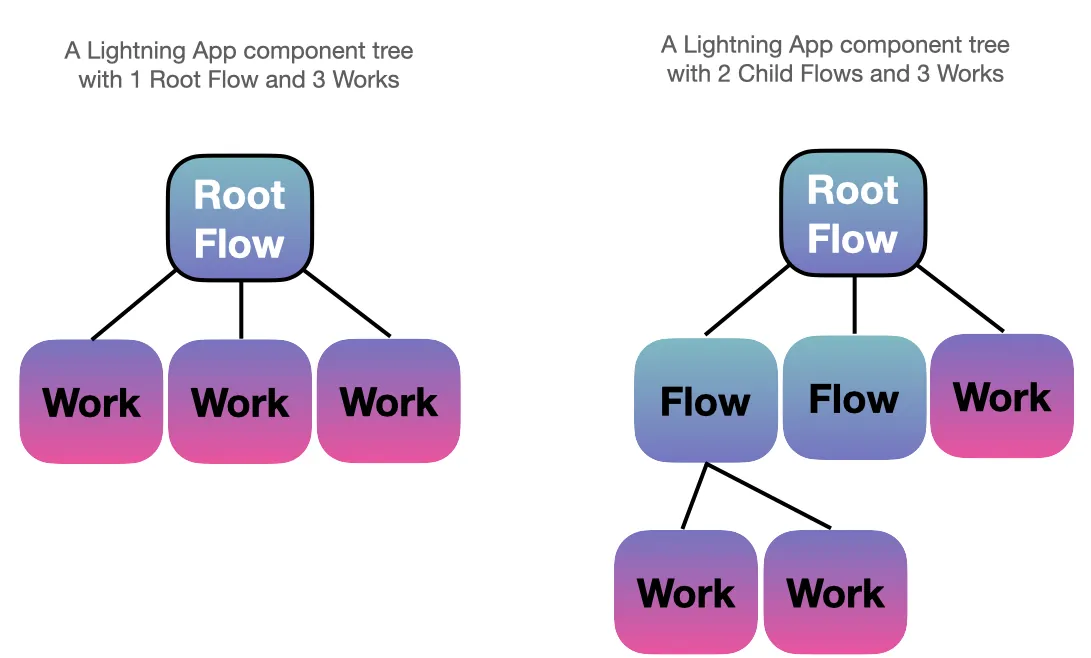
It’s worth highlighting that the component tree is a dynamic, reactive system and not a directed acyclic graph (DAG). This means that the Works can operate independently, and the communication happens via state changes orchestrated by the Flow. If you have used React before, you can think of it as a related approach. Long story short, the Lightning App component tree allows us to build pretty flexible machine learning systems.
Now, while the component tree is based on Flows and Works,
the LightningApp calls the run method of the Root Flow repeatedly, which orchestrates the Work components, as illustrated below:
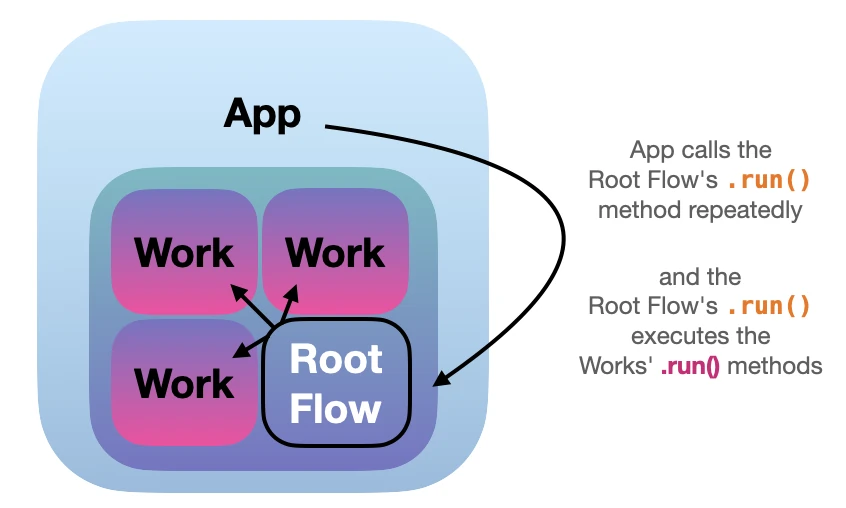
Internally, communication within the component tree happens via state changes. Each Work has its state, can run in parallel, and can react immediately to other Works. For a more in-depth discussion, see Luca Antiga’s talk on the Lightning internals.
The relevant part worth highlighting is that the Work components can operate independently. This allows us to put different Work components on different hardware. This becomes really useful if we use the Lightning framework to build a machine learning production system that takes a model from training to deployment. For example, we could use a beefy multi-node cloud GPU cluster to train the model via one Work component and then use a cheaper machine for inference via a different Work component. As we will see in the next section, using different hardware for different Work components is super simple and only requires 1 line of code!
Running a Research Demo on the Cloud
In Part 1, we ran our Lightning App locally via the following command:
lightning run app app.py
Running Apps locally can be useful for debugging and so forth. But what if we want to use additional hardware resources or share our App with others via the internet? We can run the same App on the cloud by just adding the --cloud argument:
lightning run app app.py --cloud
(You can find the source code for this App here on GitHub. And you can try the interactive version of this App on the cloud here.)
Now, if we want to give your App a more creative name, we can choose a custom name via --name:
lightning run app app.py --cloud --name superres-demo-1
This was very simple, right? Technically, since we were able to run the App successfully in the cloud, we could end the article right here …
I bet you have many questions, though. Like
- Do we need to write a setup or config file?
- Is this free?
- What compute resources does this use?
- Can we bring our own cluster?
So, in the next sections, let’s look into that some more.
Configuring the Cloud: Choosing Files and Resources
When we used the --cloud argument in the previous section, two things happened:
-
Our App was automatically uploaded to the Lightning Cloud;
-
it used a free default CPU cloud instance.
This section will pull back the curtain and discuss the setup requirements and how we can choose different compute resources.
What Are the Setup Requirements?
As you have seen above, it didn’t require any special setup procedure to run our App on the cloud when we executed the following command:
lightning run app app.py --cloud
(Okay, except that Lightning prompted you to log in if you haven’t done so yet.)
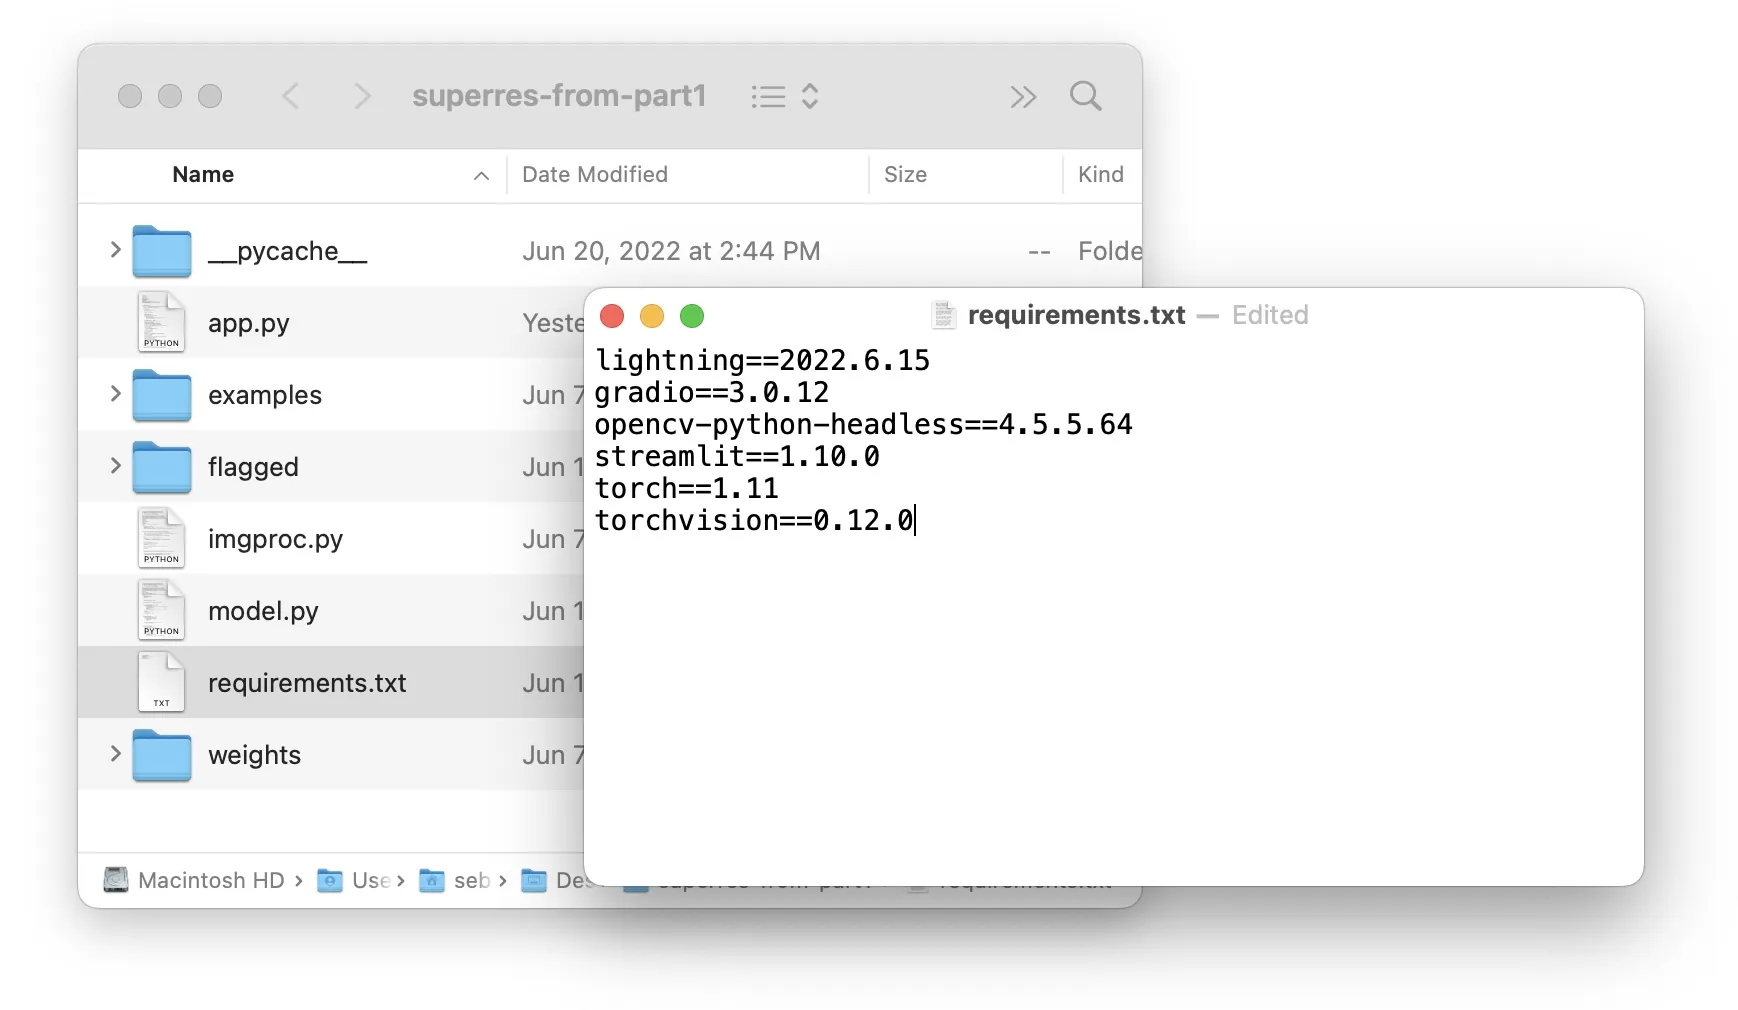
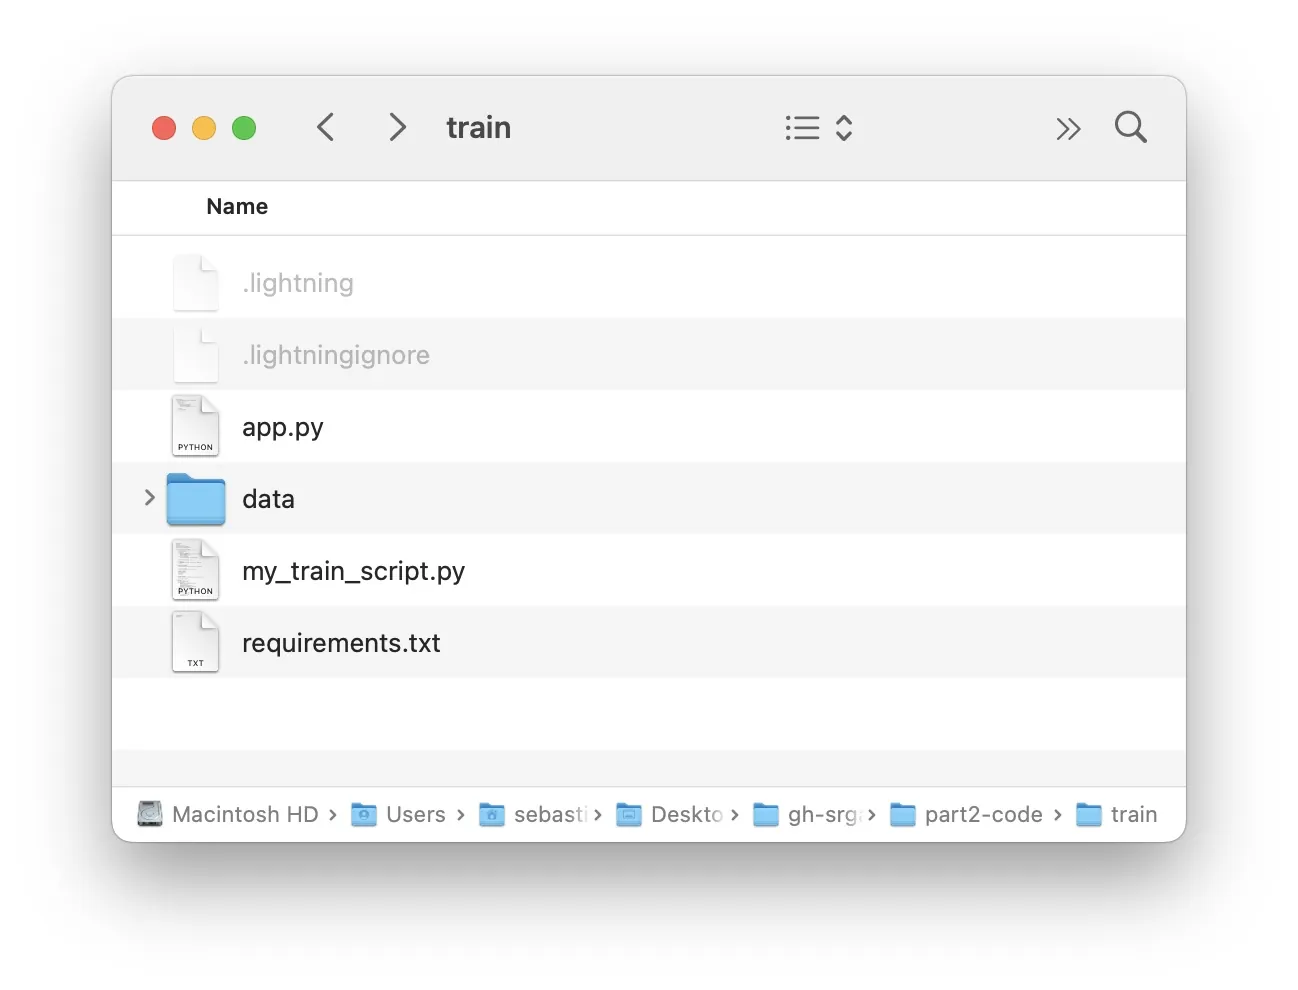
How does Lightning know how to configure our compute instances to run the code? Again, this happens all automatically; the only thing we need is a pip-compatible requirements.txt file in our app folder. However, we usually create a requirements.txt for reproducibility anyways:
In fact, if you run
lightning run app app.py --cloud
Lightning will upload all files located in the current directory. To exclude specific files, we can create a .lightningignore file that works similarly to a .gitignore file.
(Also, the first time we use the run command, Lightning will create a .lightning configuration file – we only need to edit it if we want to change the App’s name.)
Choosing Hardware via CloudCompute
When we used the --cloud argument in the previous section, our App used a free default CPU cloud instance. However, sometimes we want access to more powerful hardware, for example, a multi-GPU cluster for model training. So, let’s see how that works.
Previously, we learned that LightningWorks run independently of each other. That’s nice because it allows us to choose different, independent compute resources. For example, we could use a beefy cloud instance with multiple GPUs for a Work component that trains our model. The said cloud instance would be overkill for inference, though. So, we could use a cheaper CPU or GPU to serve the model after the training is completed.
How do we select the cloud resource? We can provide and extra cloud_compute=L.CloudCompute(...) argument to our LightningWork component as shown below:
class RootFlow(L.LightningFlow):
    def __init__(self):
        super().__init__()

        self.train_model = MyTrainingWork(
            ...,
            cloud_compute=L.CloudCompute("gpu-fast-multi", idle_timeout=20)
        )
        self.serve_model = MyServingWork(
            ...,
            cloud_compute=L.CloudCompute("cpu-medium")
        )

    def run(self):
        self.train_model.run()
        self.serve_model.run()
(As of this writing, "gpu-fast-multi" corresponds to 4xV100 GPUs. You can find a list of the currently supported instance types here.)
Note that the idle_timeout=20 argument in the code above is optional; it ensures that the GPU instance will shut down 20 seconds after training when it is not needed anymore. It’s so that we don’t waste cloud credits running a 4xV100 GPU cluster if we don’t need it.
BYOC
By default, using the --cloud flag will use resources from the Lightning Cloud. However, it’s also possible to BYOC (BYOC is short for “bring your own cluster” – yup, that’s a bit of popular tech jargon that I recently picked up in industry.) Please note that this feature is only available upon request as of this writing.
Training a Model on the Cloud
Our simple Super-Resolution research demo used a pre-trained model, and we just learned how we could share it with the world. However, as mentioned earlier, we can also use the cloud for model training. In fact, the probably most common use-cases for Lightning might be to build Train & Deploy Apps.
In this section, let’s take a bottom-up approach to train a model on the cloud. Since Lightning Apps are plain Python code, we could make the training code part of a Work’s run method. However, there is also an existing Work component that lets you run an arbitrary Python script. Let’s build a minimal App that trains a PyTorch model on a single GPU to see how that works.
A Simple Python Script Component
In this section, we will train a deep neural network in PyTorch using a cloud GPU. However, this PyTorch training script really is just a placeholder for any arbitrary script you may want to run.
You can find the complete code for this App here on GitHub. It consists of 3 main files
-
my_train_script.py: An arbitrary PyTorch script (here: a multilayer perceptron trained on MNIST.) -
app.py: The Lightning App code. -
requirements.txt: The required package versions forpip.
For this App, we don’t use any UI. The whole goal of this App is just to execute an arbitrary Python script using a cloud GPU. The code for this minimalist App is as follows:
import lightning as L
from lightning.app.components.python import TracerPythonScript

class RootFlow(L.LightningFlow):
    def __init__(self):
        super().__init__()

        self.train_model = TracerPythonScript(
            script_path="my_train_script.py",
            script_args=["--num_epochs=1"],
            cloud_compute=L.CloudCompute("gpu", idle_timeout=60),
        )

    def run(self):
        self.train_model.run()

app = L.LightningApp(RootFlow())
Looking at the code above, we can see that our component tree consists of a LightningFlow and a LightningWork. Here, we used TracerPythonScript, a LightningWork component for running a Python script with optional command-line arguments. In our case, we configured the my_train_script.py file to accept command-line arguments via the argparse Python standard library.
Moreover, we used CloudCompute to specify our GPU resource. As of this writing, L.CloudCompute("gpu") uses an affordable T4 GPU which costs approximately 50 cents per hour. (You can find a list of all supported GPU instance types here).
Similar to what we did in previous sections, we can run this App via
lightning run app app.py --cloud
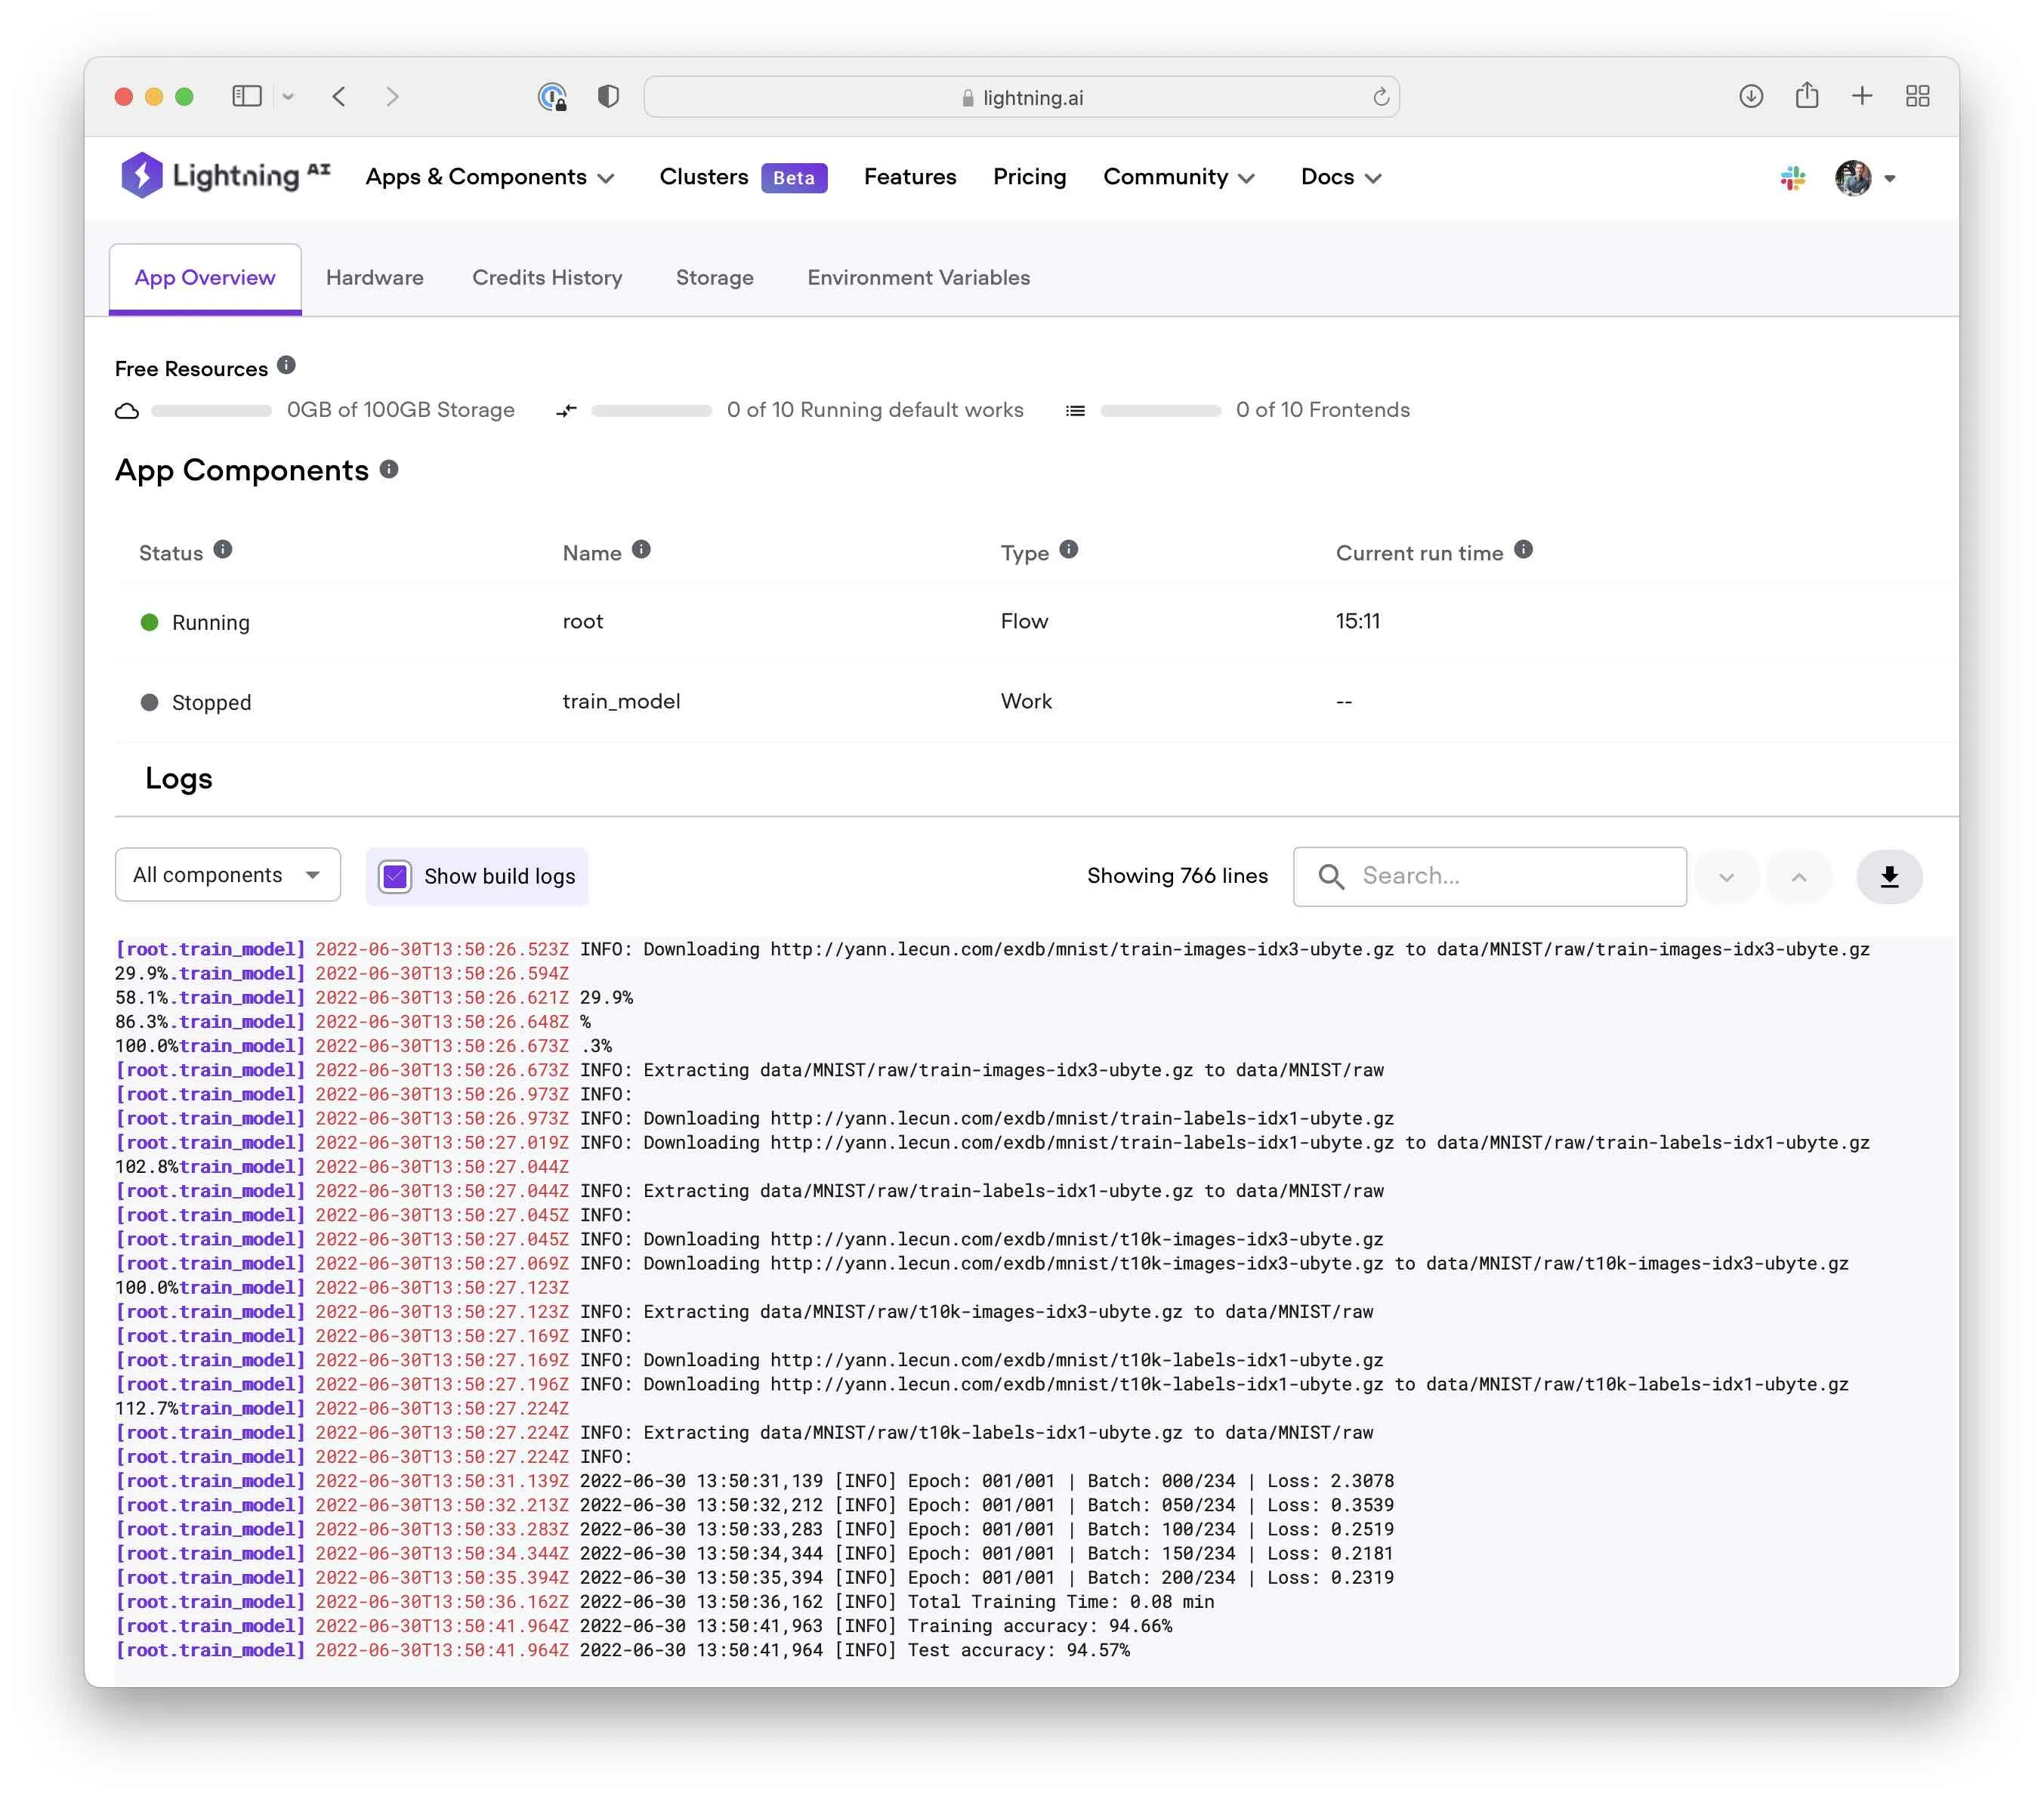
Running the above code should open the App in a new browser window. It may take a few moments until the model starts training, but you should see the training outputs in the Lightning console. Also, since we specified the idle_timeout=60, the App will shut down the GPU instance one minute after completing the training.
Saving and Downloading File Outputs
In the previous section, we ran a simple “train” app that ran a Python script my_python_script.py on the Lightning Cloud. This was a very simple app printing the loss and prediction accuracies of a deep neural network to the command line:
Epoch: 001/001 | Batch: 000/234 | Loss: 2.3135
Epoch: 001/001 | Batch: 050/234 | Loss: 0.4393
Epoch: 001/001 | Batch: 100/234 | Loss: 0.2753
Epoch: 001/001 | Batch: 150/234 | Loss: 0.2312
Epoch: 001/001 | Batch: 200/234 | Loss: 0.2797
Total Training Time: 0.03 min
Training accuracy: 94.03%
Test accuracy: 93.80%
In a real-world scenario, we may be interested in saving the model weights – unless we are just optimizing hyperparameters, what’s the point of training a model in the cloud if we can’t use it later? So, let’s briefly look at how Lightning manages files.
Understanding Lightning Storage
Coming back to the point we made about LightningWorks earlier: one of the pleasant side-effects of having LightningWorks operate independently is that we can have them on entirely different machines. So, for example, we can rent an expensive GPU cluster for model training and a cheaper computer for inference. However, as a consequence, LightningWorks also have independent file systems.
How can we share files between Works? There are two main storage APIs:
-
Drive: You can think of a Lightning Drive object as a virtual location where you can place files – similar to Google Drive, OneDrive, or Dropbox. It’s a location that any LightningWork can access. -
Path: A Lightning Path object is more directional or specific than a Drive. A Path can be passed between LightningWorks in only one direction: from a file creator to a file receiver Work component.
When to use which? While Drive (as a central place) and Path (for uni-directional file transfer) are slightly different, we can usually use either or – it ultimately mostly comes down to personal preference. You can read more about the differences here.
Creating a Train & Save App
Now, after the little tangent introducing the Lightning Path and Drive storage APIs on a conceptual level, let’s see how this works in practice. In this section, we will upgrade our “training” App to download the trained model from the cloud. To do this, we have to add the local files to the Lightning file system so that we can then access them from the web UI for download. Here, the local files are the files created by the cloud instance running the LightningWork.
First of all, we will modify our PyTorch model training script so that it saves the model weights and also writes a log file.
We add a few argparse options so that we can define the output file names via command-line arguments as follows:
python my_train_script.py \
--num_epochs 1 \
--model_out my_trained_model.pt \
--log_out log.txt
You can think of this as a generic Python script for model training that we would typically write in our research project.
Now, let’s look at the app_with_path.py file, which is a modified version of the previous app.py file:
import shutil
from pathlib import Path

import lightning as L
from lightning.app.components.python import TracerPythonScript


class TrainAndSaveModel(TracerPythonScript):
    def __init__(self, **kwargs):
        super().__init__(**kwargs)

        # create virtual paths
        self.model_path = "lit://my_trained_model.pt"
        self.log_path = "lit://log.txt"

    def on_after_run(self, _):
        # copy files from local file system to the virtual paths
        shutil.copy(Path.cwd() / "my_trained_model.pt", self.model_path)
        shutil.copy(Path.cwd() / "log.txt", self.log_path)


class RootFlow(L.LightningFlow):
    def __init__(self):
        super().__init__()

        self.train_model = TrainAndSaveModel(
            script_path="my_train_script.py",
            script_args=[
                "--num_epochs=1",
                "--model_out=my_trained_model.pt",
                "--log_out=log.txt",
            ],
            cloud_compute=L.CloudCompute("gpu", idle_timeout=60),
        )

    def run(self):
        self.train_model.run()


app = L.LightningApp(RootFlow())
This App may look very complicated at first glance, so let’s walk through this step by step.
The RootFlow is almost unchanged. The first difference compared to the previous training app.py file is that my_train_script.py now accepts multiple command-line arguments. The second difference is that we now use TrainAndSaveModel instead of TracerPythonScript. Here, TrainAndSaveModel is a custom component we created by subclassing TracerPythonScript.
Let’s look at the custom TrainAndSaveModel Python class more closely. We set it up to inherit from TracerPythonScript but made two slight modifications. First, in the constructor, we create two virtual paths:
# create virtual paths
self.model_path = "lit://my_trained_model.pt"
self.log_path = "lit://log.txt"
Second, we defined a custom .on_after_run() method:
def on_after_run(self, _):
    # copy files from local file system to the virtual paths
    shutil.copy(Path.cwd() / "my_trained_model.pt", self.model_path)
    shutil.copy(Path.cwd() / "log.txt", self.log_path)
The on_after_run method of a LightningWork component has a special behavior: it’s executed after the Work’s .run() method has finished. Here, the on_after_run method copies files from the local file system of the machine that the Work is running on (Path.cwd() / "my_trained_model.pt") to the virtual location we created in the Lightning storage ("lit://my_trained_model.pt").
That’s it. Now, we can run this App as usual:
lightning run app app_with_path.py --cloud
And after the run has completed, we should be able to download the log file along with the trained model weights from the Storage UI:
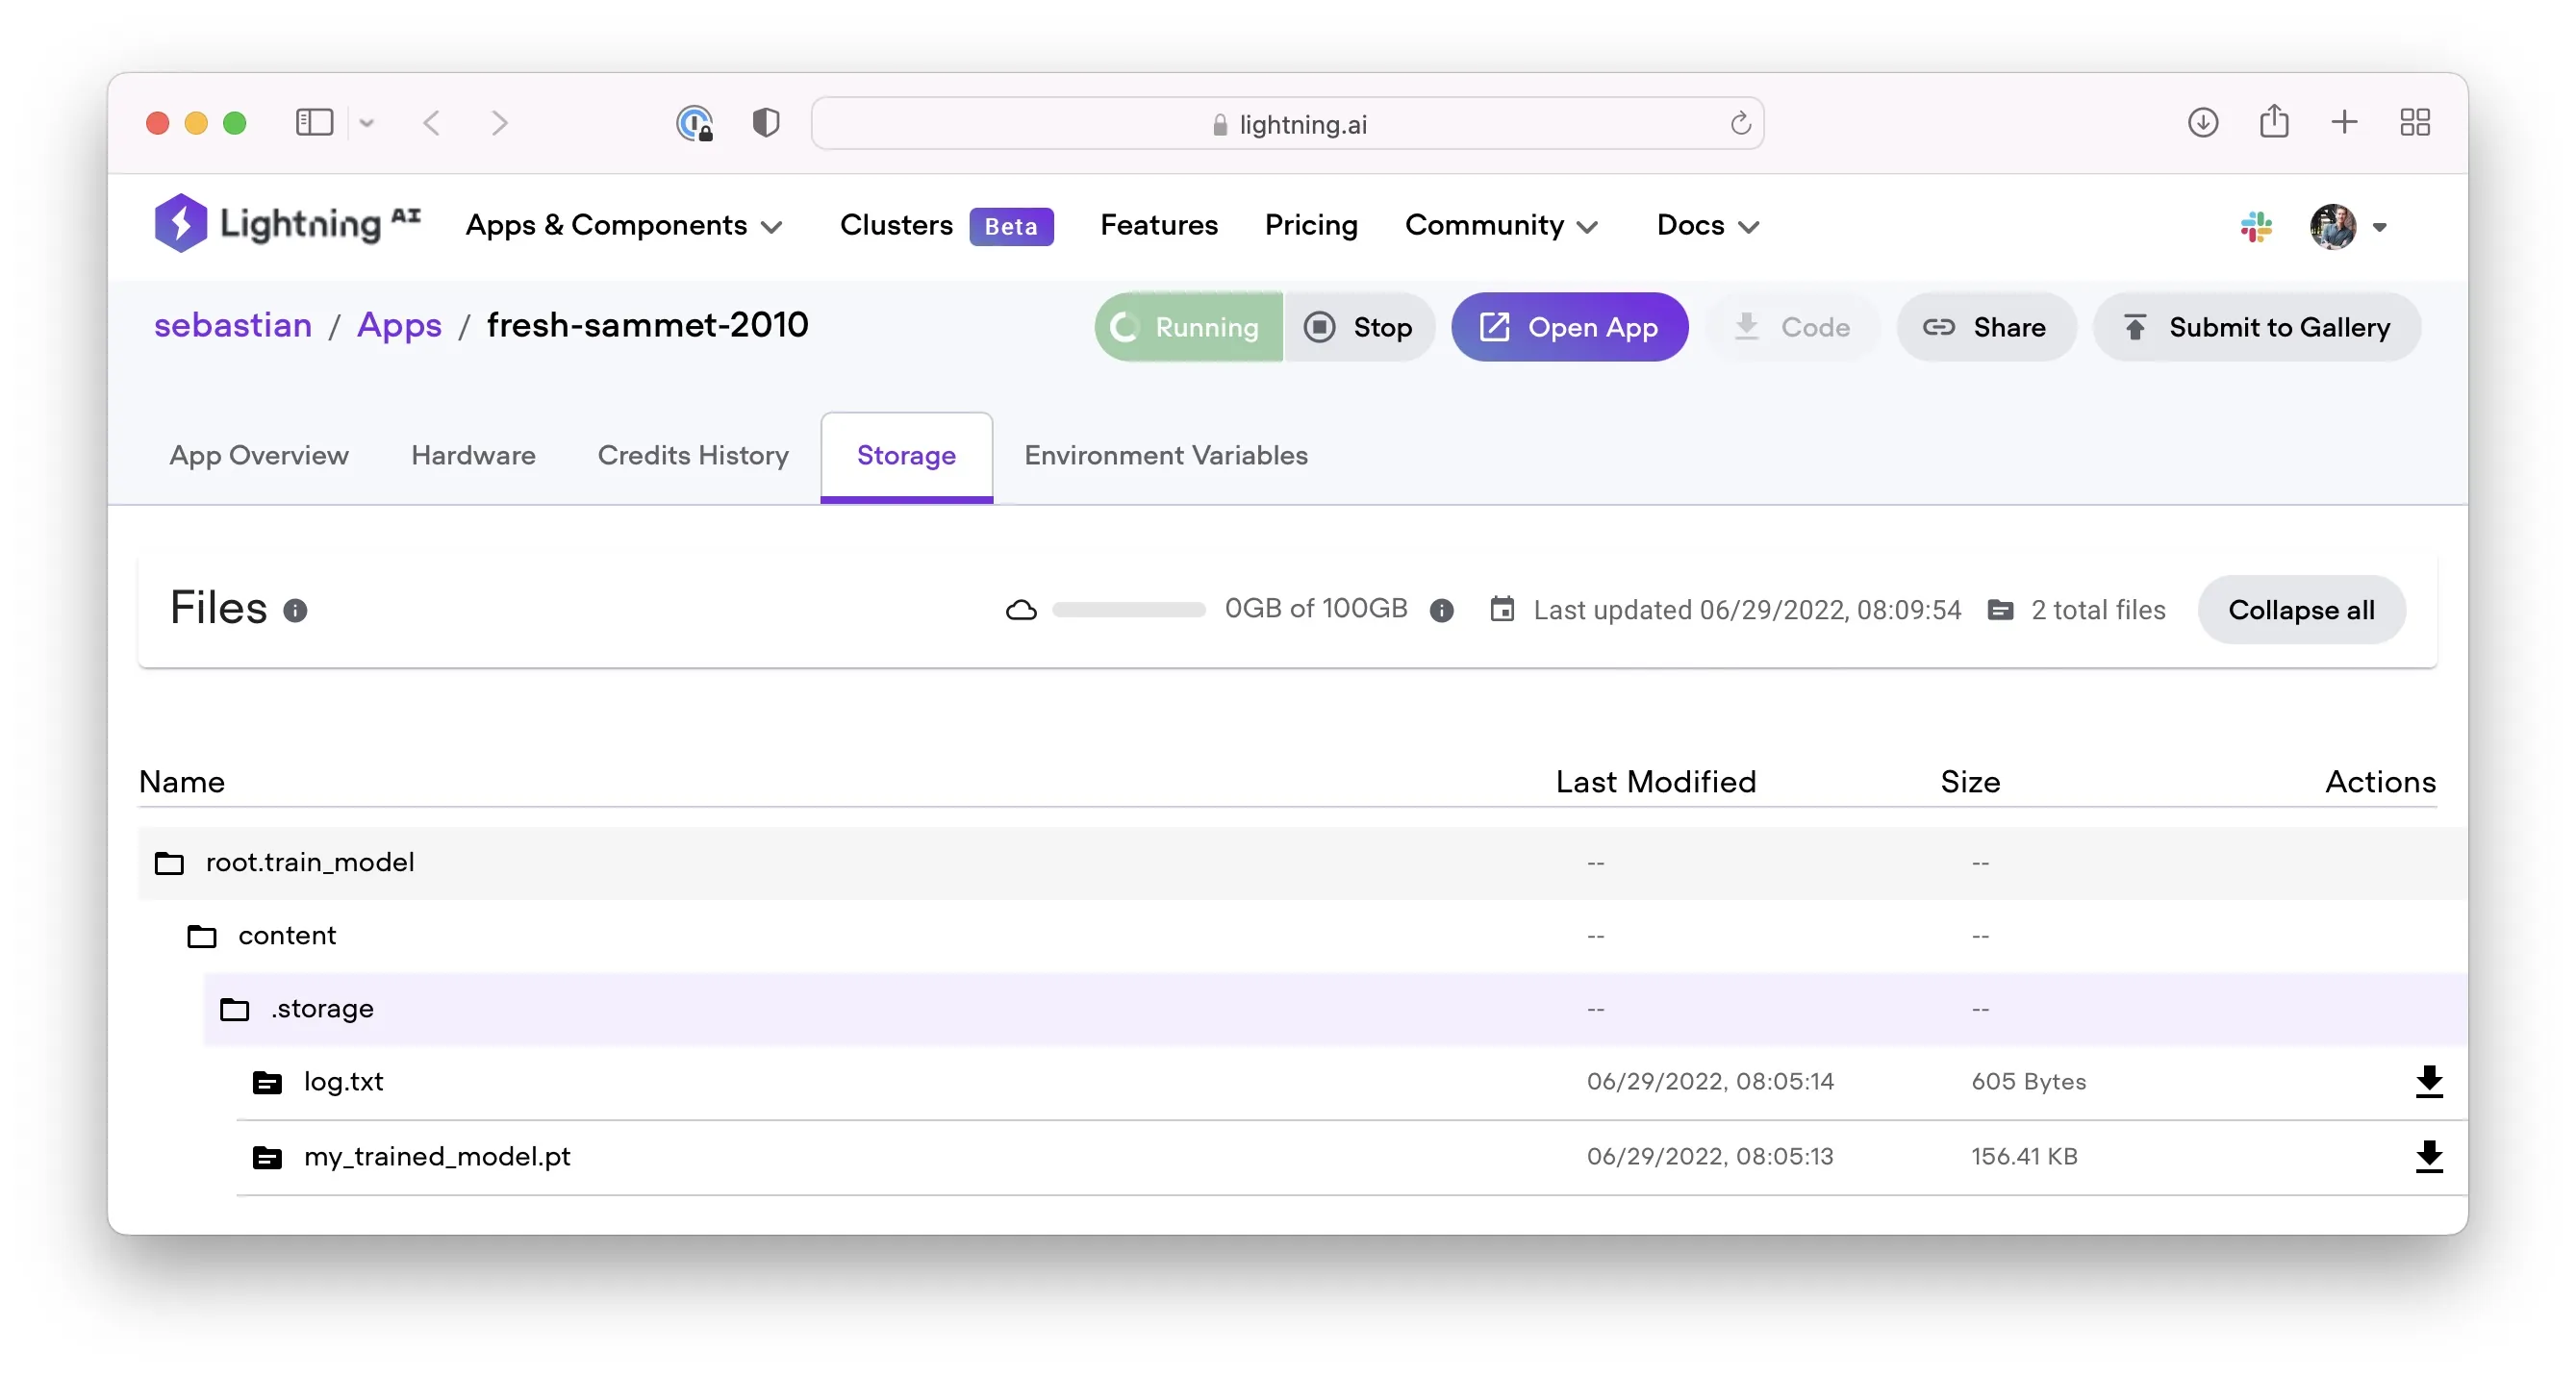
By the way, if you are interested, here is an equivalent version using Drive instead of Path: app_with_drive.py. (Credit goes to Adrian Waelchli for all the help and insightful discussions!)
Bonus: A More Sophisticated PyTorch Lightning Training App
In the previous section, we developed a minimal App for model training. This was primarily meant to demonstrate how we can use cloud resources to train a model and how Lightning storage works.
If we are interested in using Lightning for model training, there are more sophisticated Apps we can adopt. For example, the PyTorch Lightning App puts a nice UI on top of an arbitrary PyTorch Lightning script.
Let’s give it a try!
For this, assume we have an arbitrary PyTorch Lightning script. Typically, I structure my deep learning code as shown below:
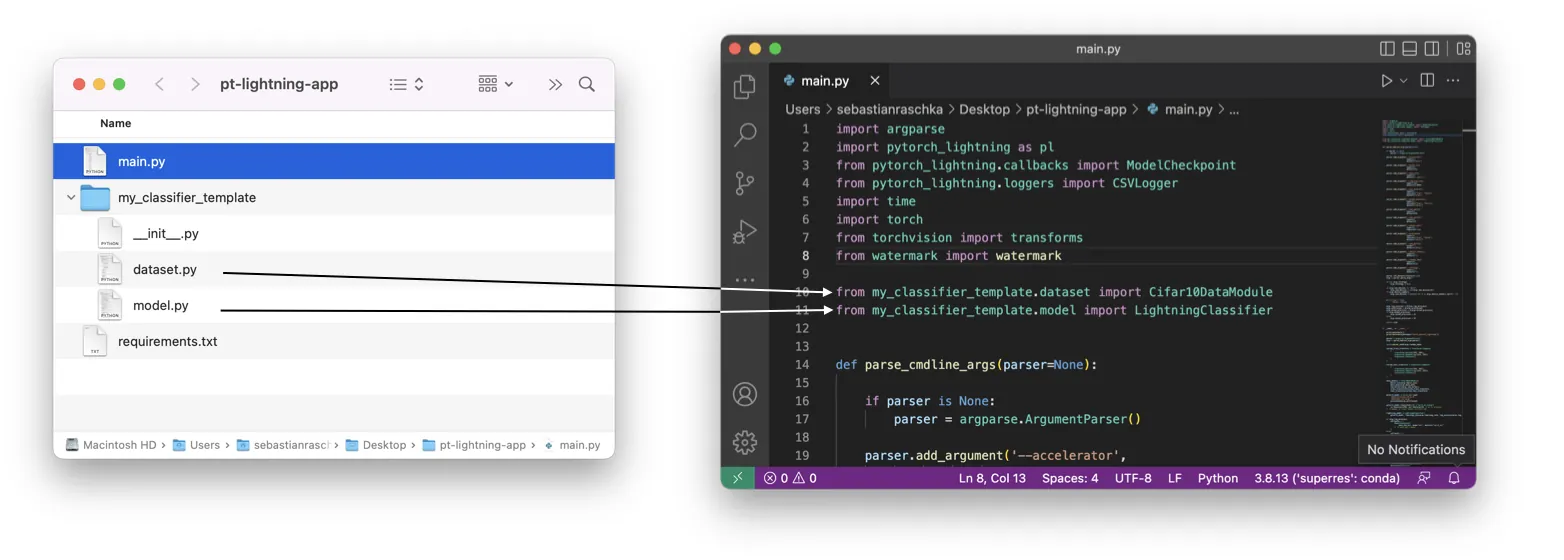
Usually, I have a main file (here main.py) that runs my code. And I prefer to have the dataset and model code in separate Python files to keep things more organized. Since you can think of this as an arbitrary PyTorch Lightning code project, we won’t discuss it in detail, but you can take a look at the code here: main.py.
Now, let’s run this code on the cloud using the PyTorch Lightning App from the App Gallery.
First, let’s set up a fresh environment:
conda create -n plapp python=3.8
conda activate plapp
pip install -r requirements.txt
Next, let’s install the PyTorch Lightning App from the command line:
# Create an App from our PyTorch Lightning script main.py
# This will create a new subfolder pl-app
lightning init pl-app main.py
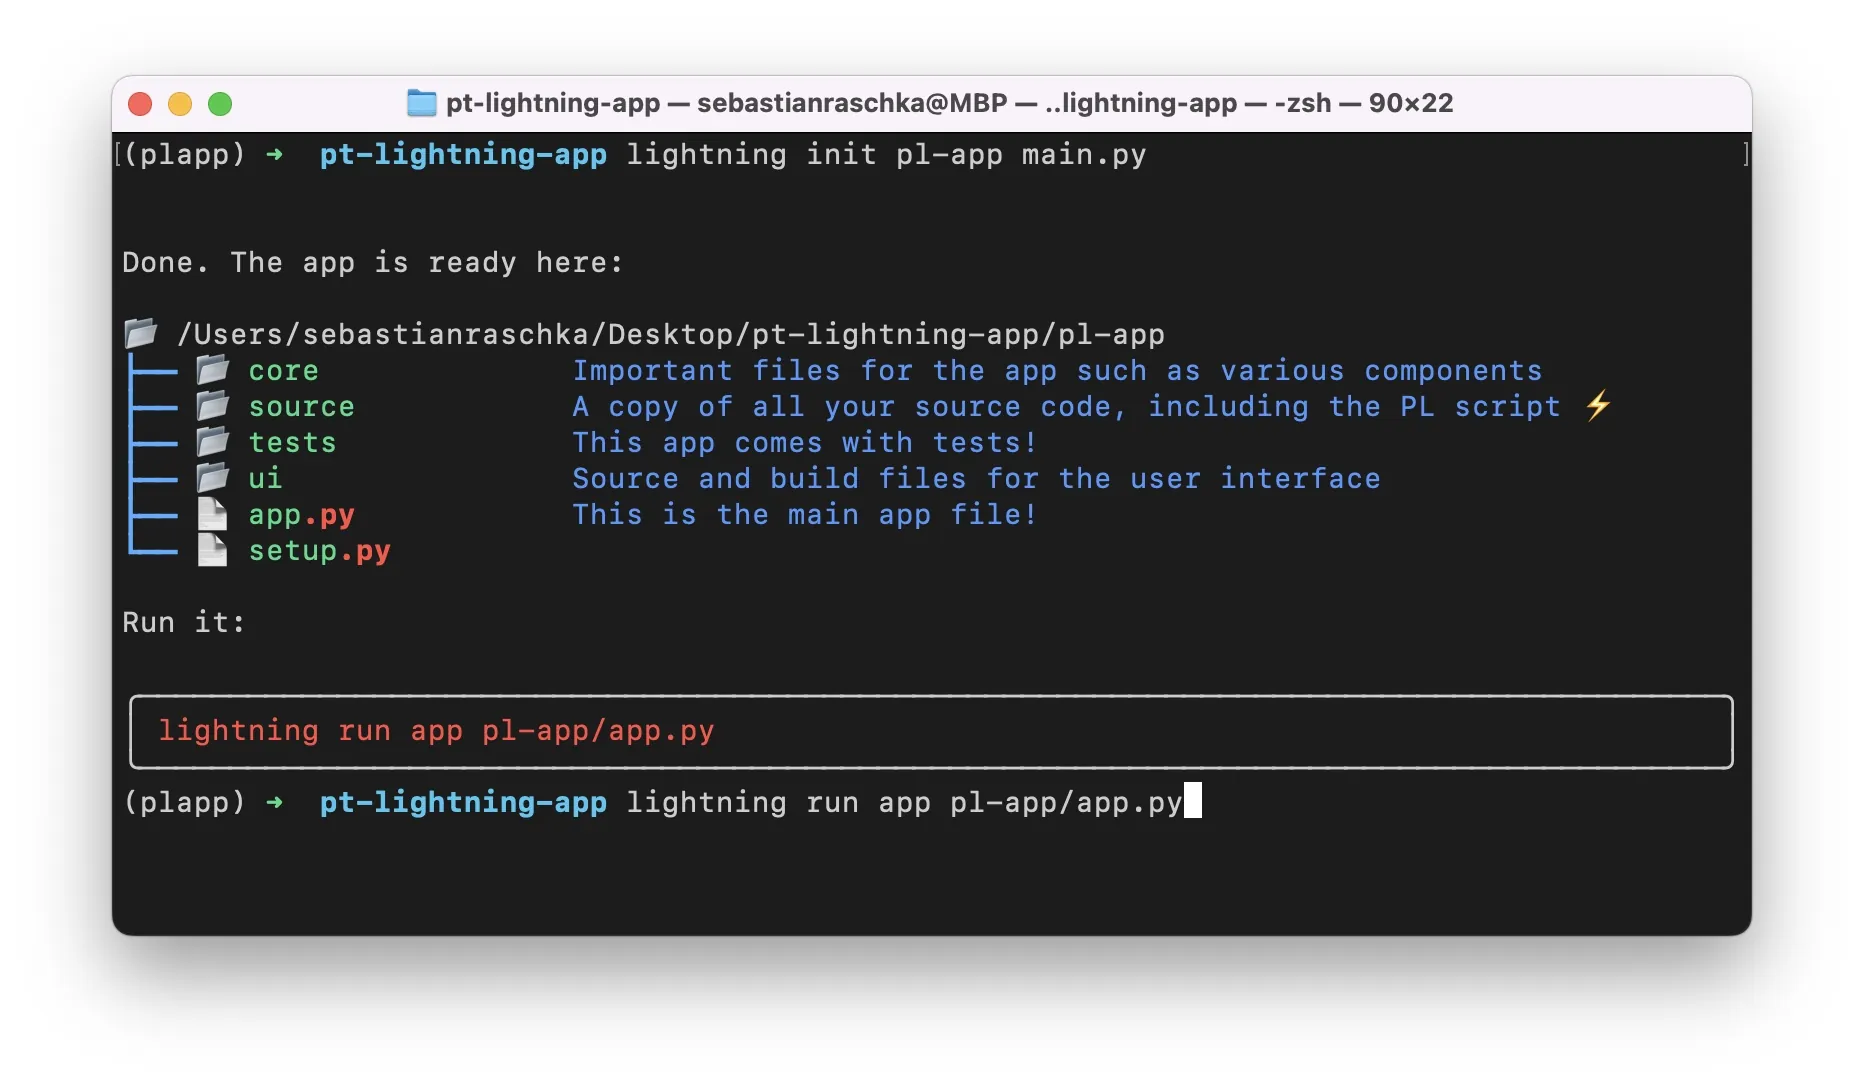
Before running anything in the cloud, I recommend trying it out locally:
# Run the App locally
lightning run app pl-app/app.py
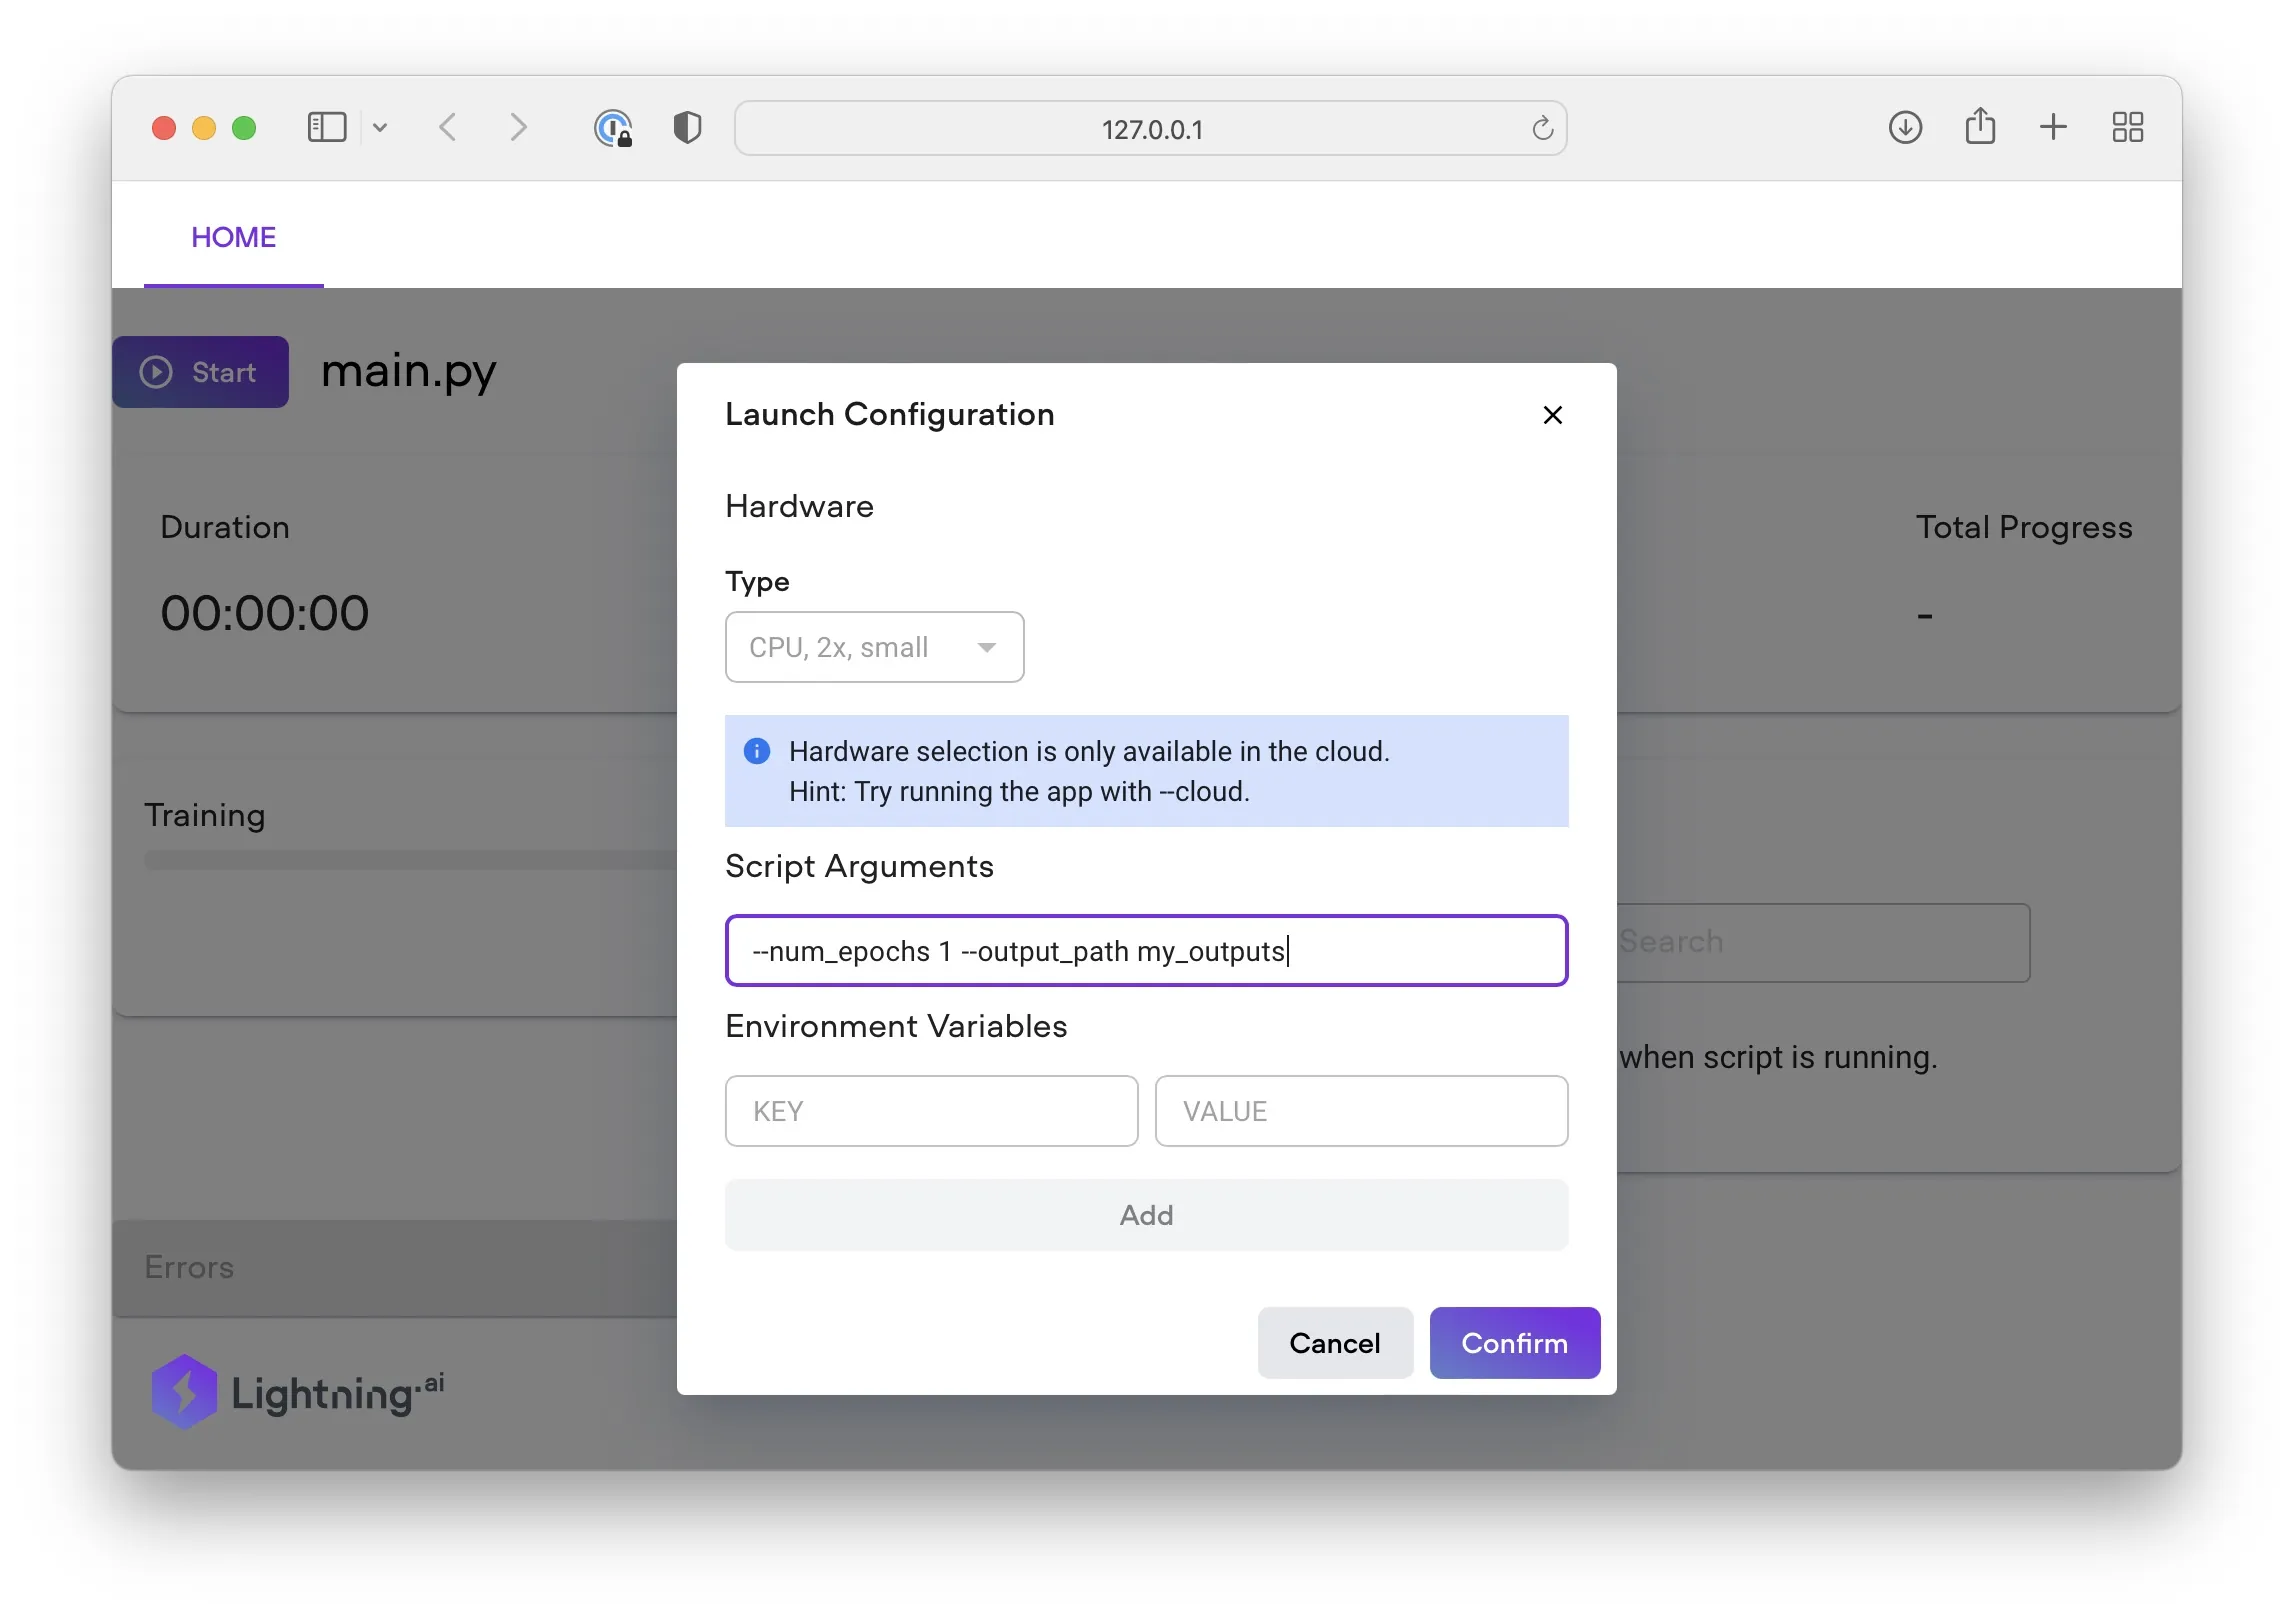
(Note that if we run it locally, we won’t be able to select additional cloud resources and so forth. This is because the script arguments we enter depend on how we structured our main.py file.)
Depending on your computer, the training might be very slow. So, we could run the App in the cloud via the familiar command:
lightning run app pl-app/app.py --cloud
Next: Developing Custom Components
In Part 1, we created our first Lightning App. We started with a Hello World App to see how things work under the hood. Then, we created a simple research demo to try out some user interface components. In Part 2, we got to the interesting part and uploaded the App to the cloud. Moreover, we learned about Lightning storage and saw how we could train arbitrary machine learning models.
At this point, you should be well-equipped to create (more) compelling research demos and maybe even develop Train & Deploy Apps for production. I encourage you to browse the App and Component Galleries for inspiration.
However, the chances are that you are looking for components with additional features. So stay tuned for In Part 3, where we are going to customize Components (similar to what we did with the TracerPythonScript and TrainAndSaveModel classes earlier in this article).
Read Next
 Sharing Deep Learning Research Models with Lightning Part 1: Building A Super Resolution App
Build a Super Resolution GAN app with Lightning.ai: interactive UI, model serving, and a modern workflow for sharing deep learning research.
Sharing Deep Learning Research Models with Lightning Part 1: Building A Super Resolution App
Build a Super Resolution GAN app with Lightning.ai: interactive UI, model serving, and a modern workflow for sharing deep learning research.
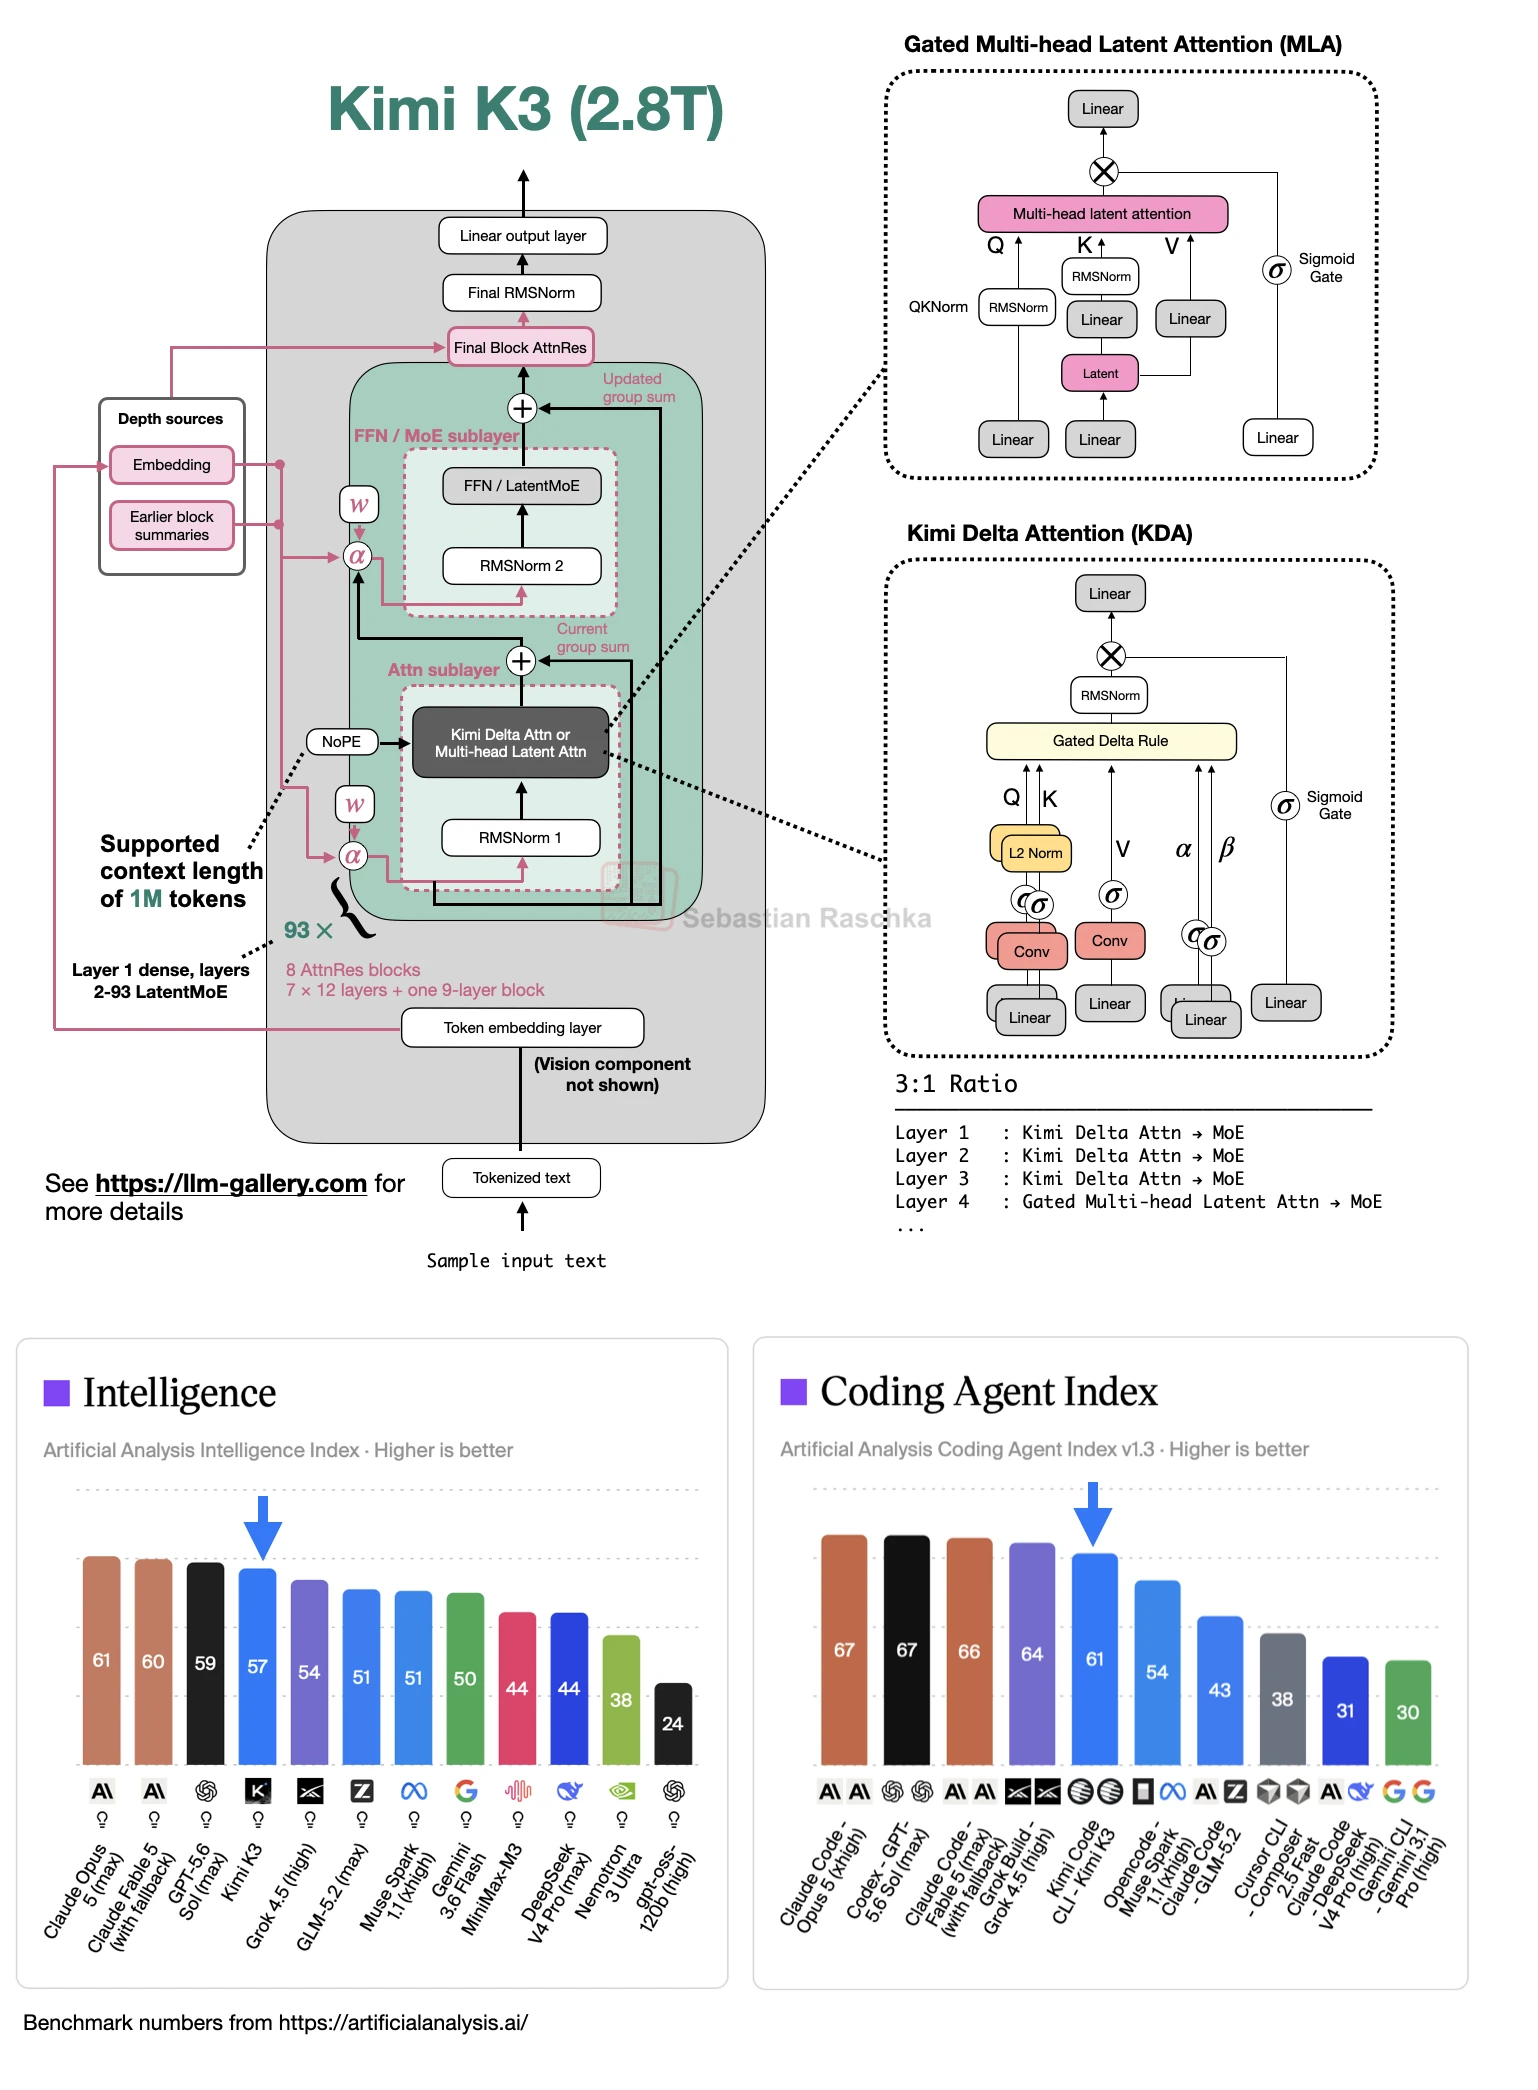 Kimi K3 Architecture Notes
Short architecture note on Kimi K3, including LatentMoE, Kimi Delta Attention, Attention Residuals, NoPE, multimodality, and inference-efficiency choices.
Kimi K3 Architecture Notes
Short architecture note on Kimi K3, including LatentMoE, Kimi Delta Attention, Attention Residuals, NoPE, multimodality, and inference-efficiency choices.
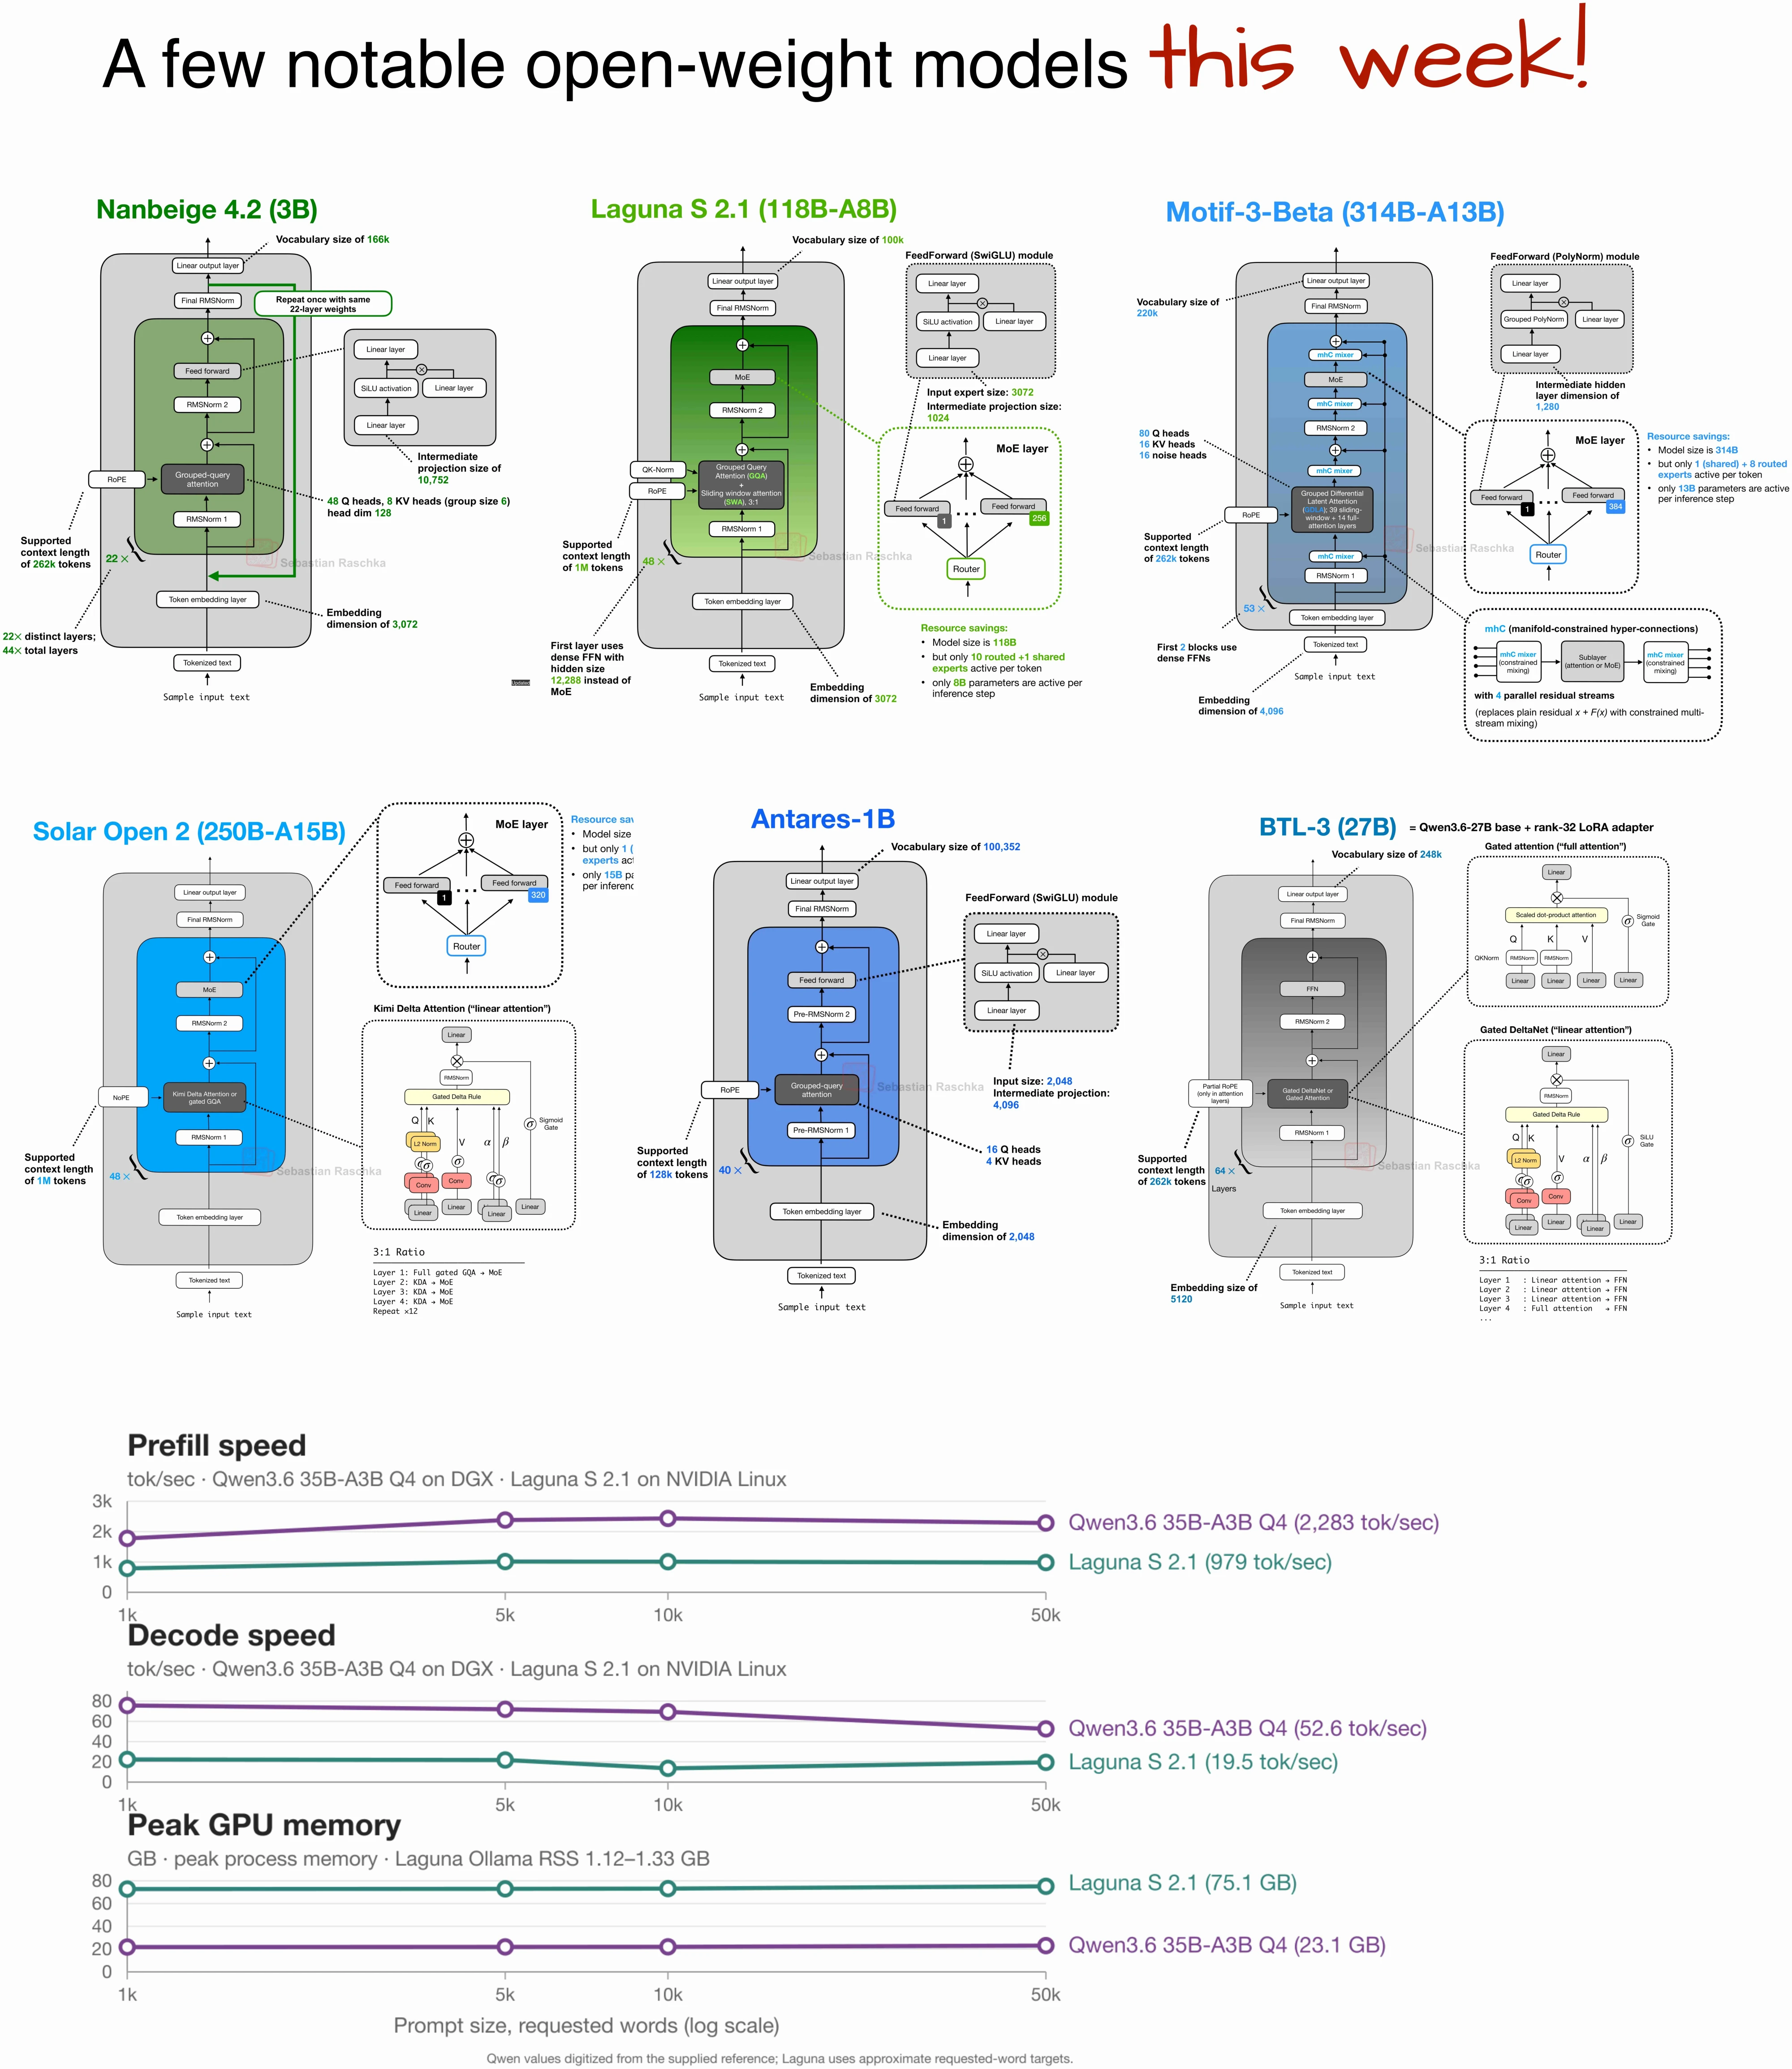 A Few Notable Open-Weight Models This Week
Short note on the architectures of six new open-weight models, including Nanbeige 4.2, Laguna S 2.1, Motif-3-Beta, Solar Open 2, Antares 1B, and BTL-3.
A Few Notable Open-Weight Models This Week
Short note on the architectures of six new open-weight models, including Nanbeige 4.2, Laguna S 2.1, Motif-3-Beta, Solar Open 2, Antares 1B, and BTL-3.

If you read the book and have a few minutes to spare, I'd really appreciate a brief review. It helps us authors a lot!
Your support means a great deal! Thank you!