Sharing Deep Learning Research Models with Lightning Part 1: Building A Super Resolution App
In this post, we will build a Lightning App. Why? Because it is 2022, and it is time to explore a more modern take on interacting with, presenting, and sharing our deep learning models. We are going to tackle this in three parts. In this first part, we will learn what a Lightning App is and how we build a Super Resolution GAN demo.
In Part 2, we will deploy our App to the cloud. And in Part 3, we will see how we can customize and develop new components for our App.
As a user, you typically don’t have to build an App from scratch – you are encouraged to explore the App Gallery to see whether an existing App already fits your needs. If you are curious about how Lightning Apps work, this article offers a little glimpse behind the scenes to understand how the core API works.
- What are Lightning Apps?
- The 3 Pieces of the Core API: A Brief Overview
- Starting with a Minimal App: Hello World
- Developing a Minimal App
- Developing A Super Resolution App
- Next: Deploying the App on the Cloud
What are Lightning Apps?
Lightning Apps are based on the open-source Lightning framework that just launched on June 16th, 2022.
The AI and machine learning communities have developed a huge number of awesome tools and services, ranging from experiment tracking to various interactive frontends. Lightning AI brings together different components and lets us combine and develop Lightning Apps, including those that take deep learning models from training to production. In short, the Lightning framework allows us to build modular, distributed, and dynamic Al applications for both enterprise and the research community.
Lightning Apps are very versatile, and I encourage you to check out the App Gallery to get a taste of what’s already possible. In this article, however, we will focus on a simple case of building a research demo App from scratch. That’s because we have to start somewhere, and as machine learning researchers, this is something that can help us to share and present our research more effectively.
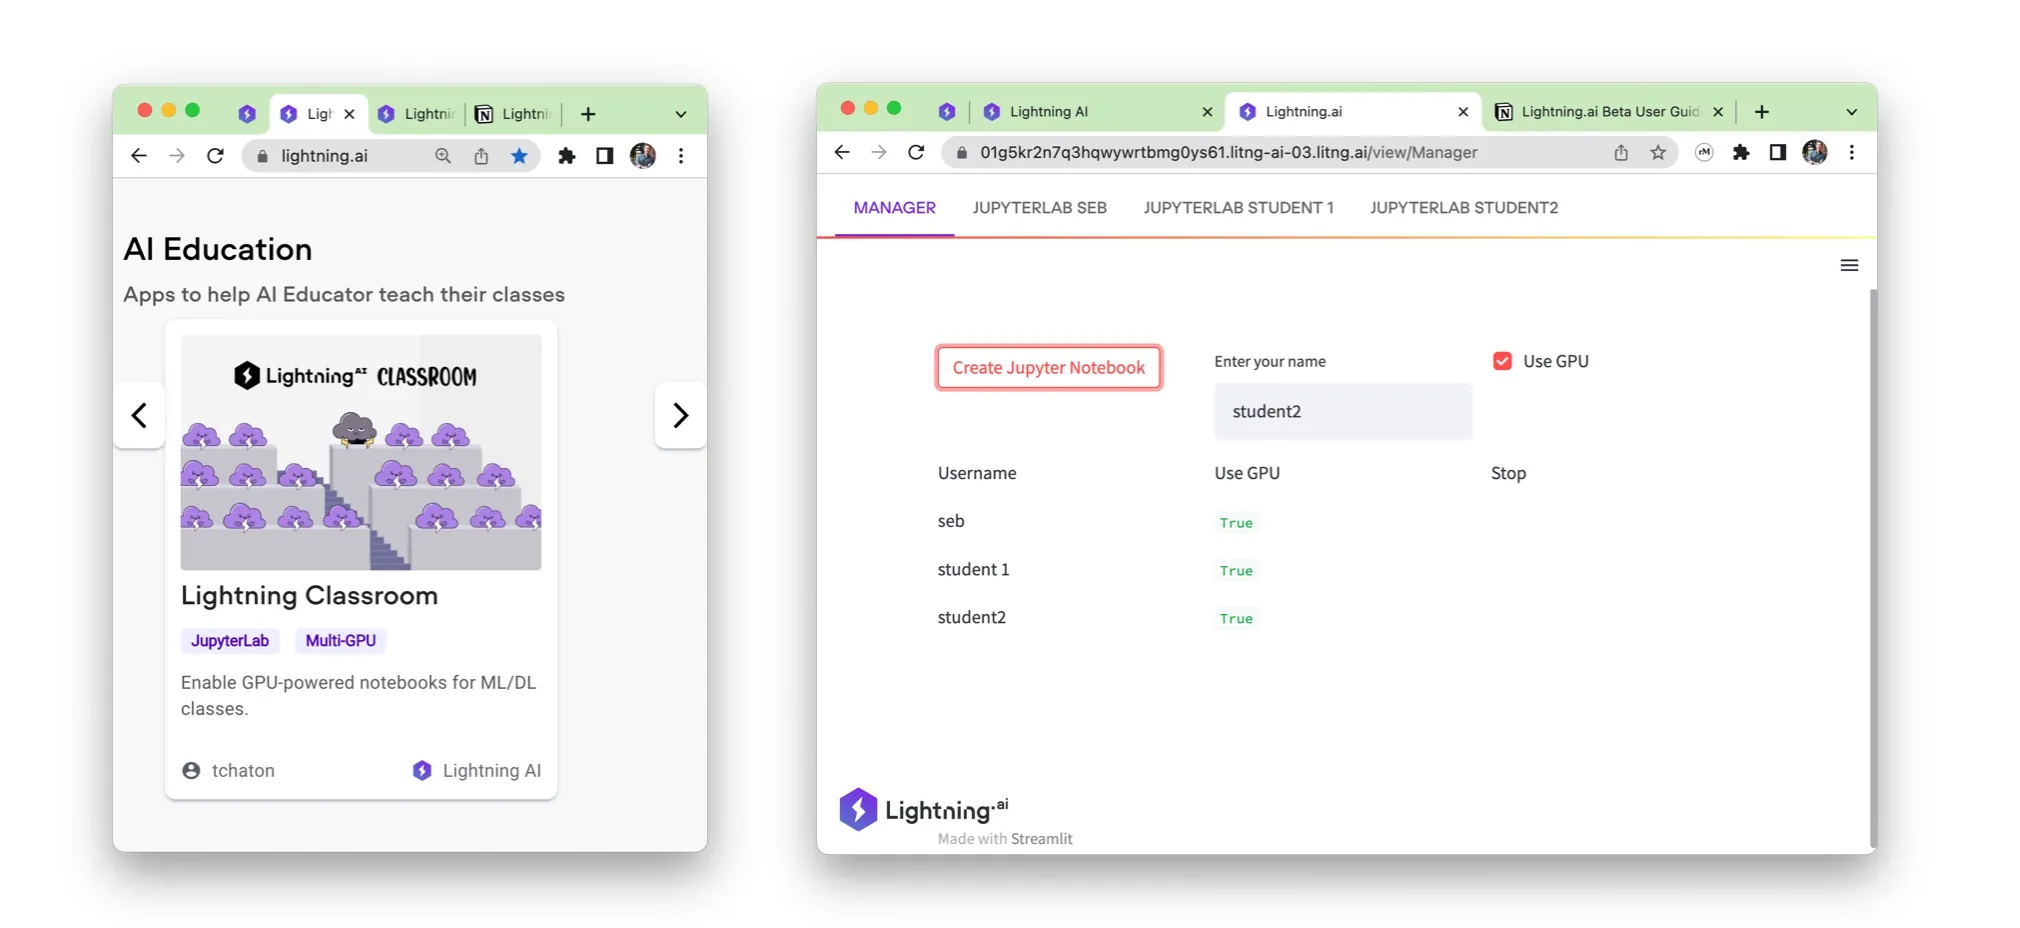
However, I want to emphasize that Lightning Apps are not just research demos; you can build pretty much anything in Lighting, even something like a computer cluster scheduler. For example, have a look at Lightning Classroom App, which allows us to spin up GPU Notebooks and share them with our students in a classroom or workshop setting:
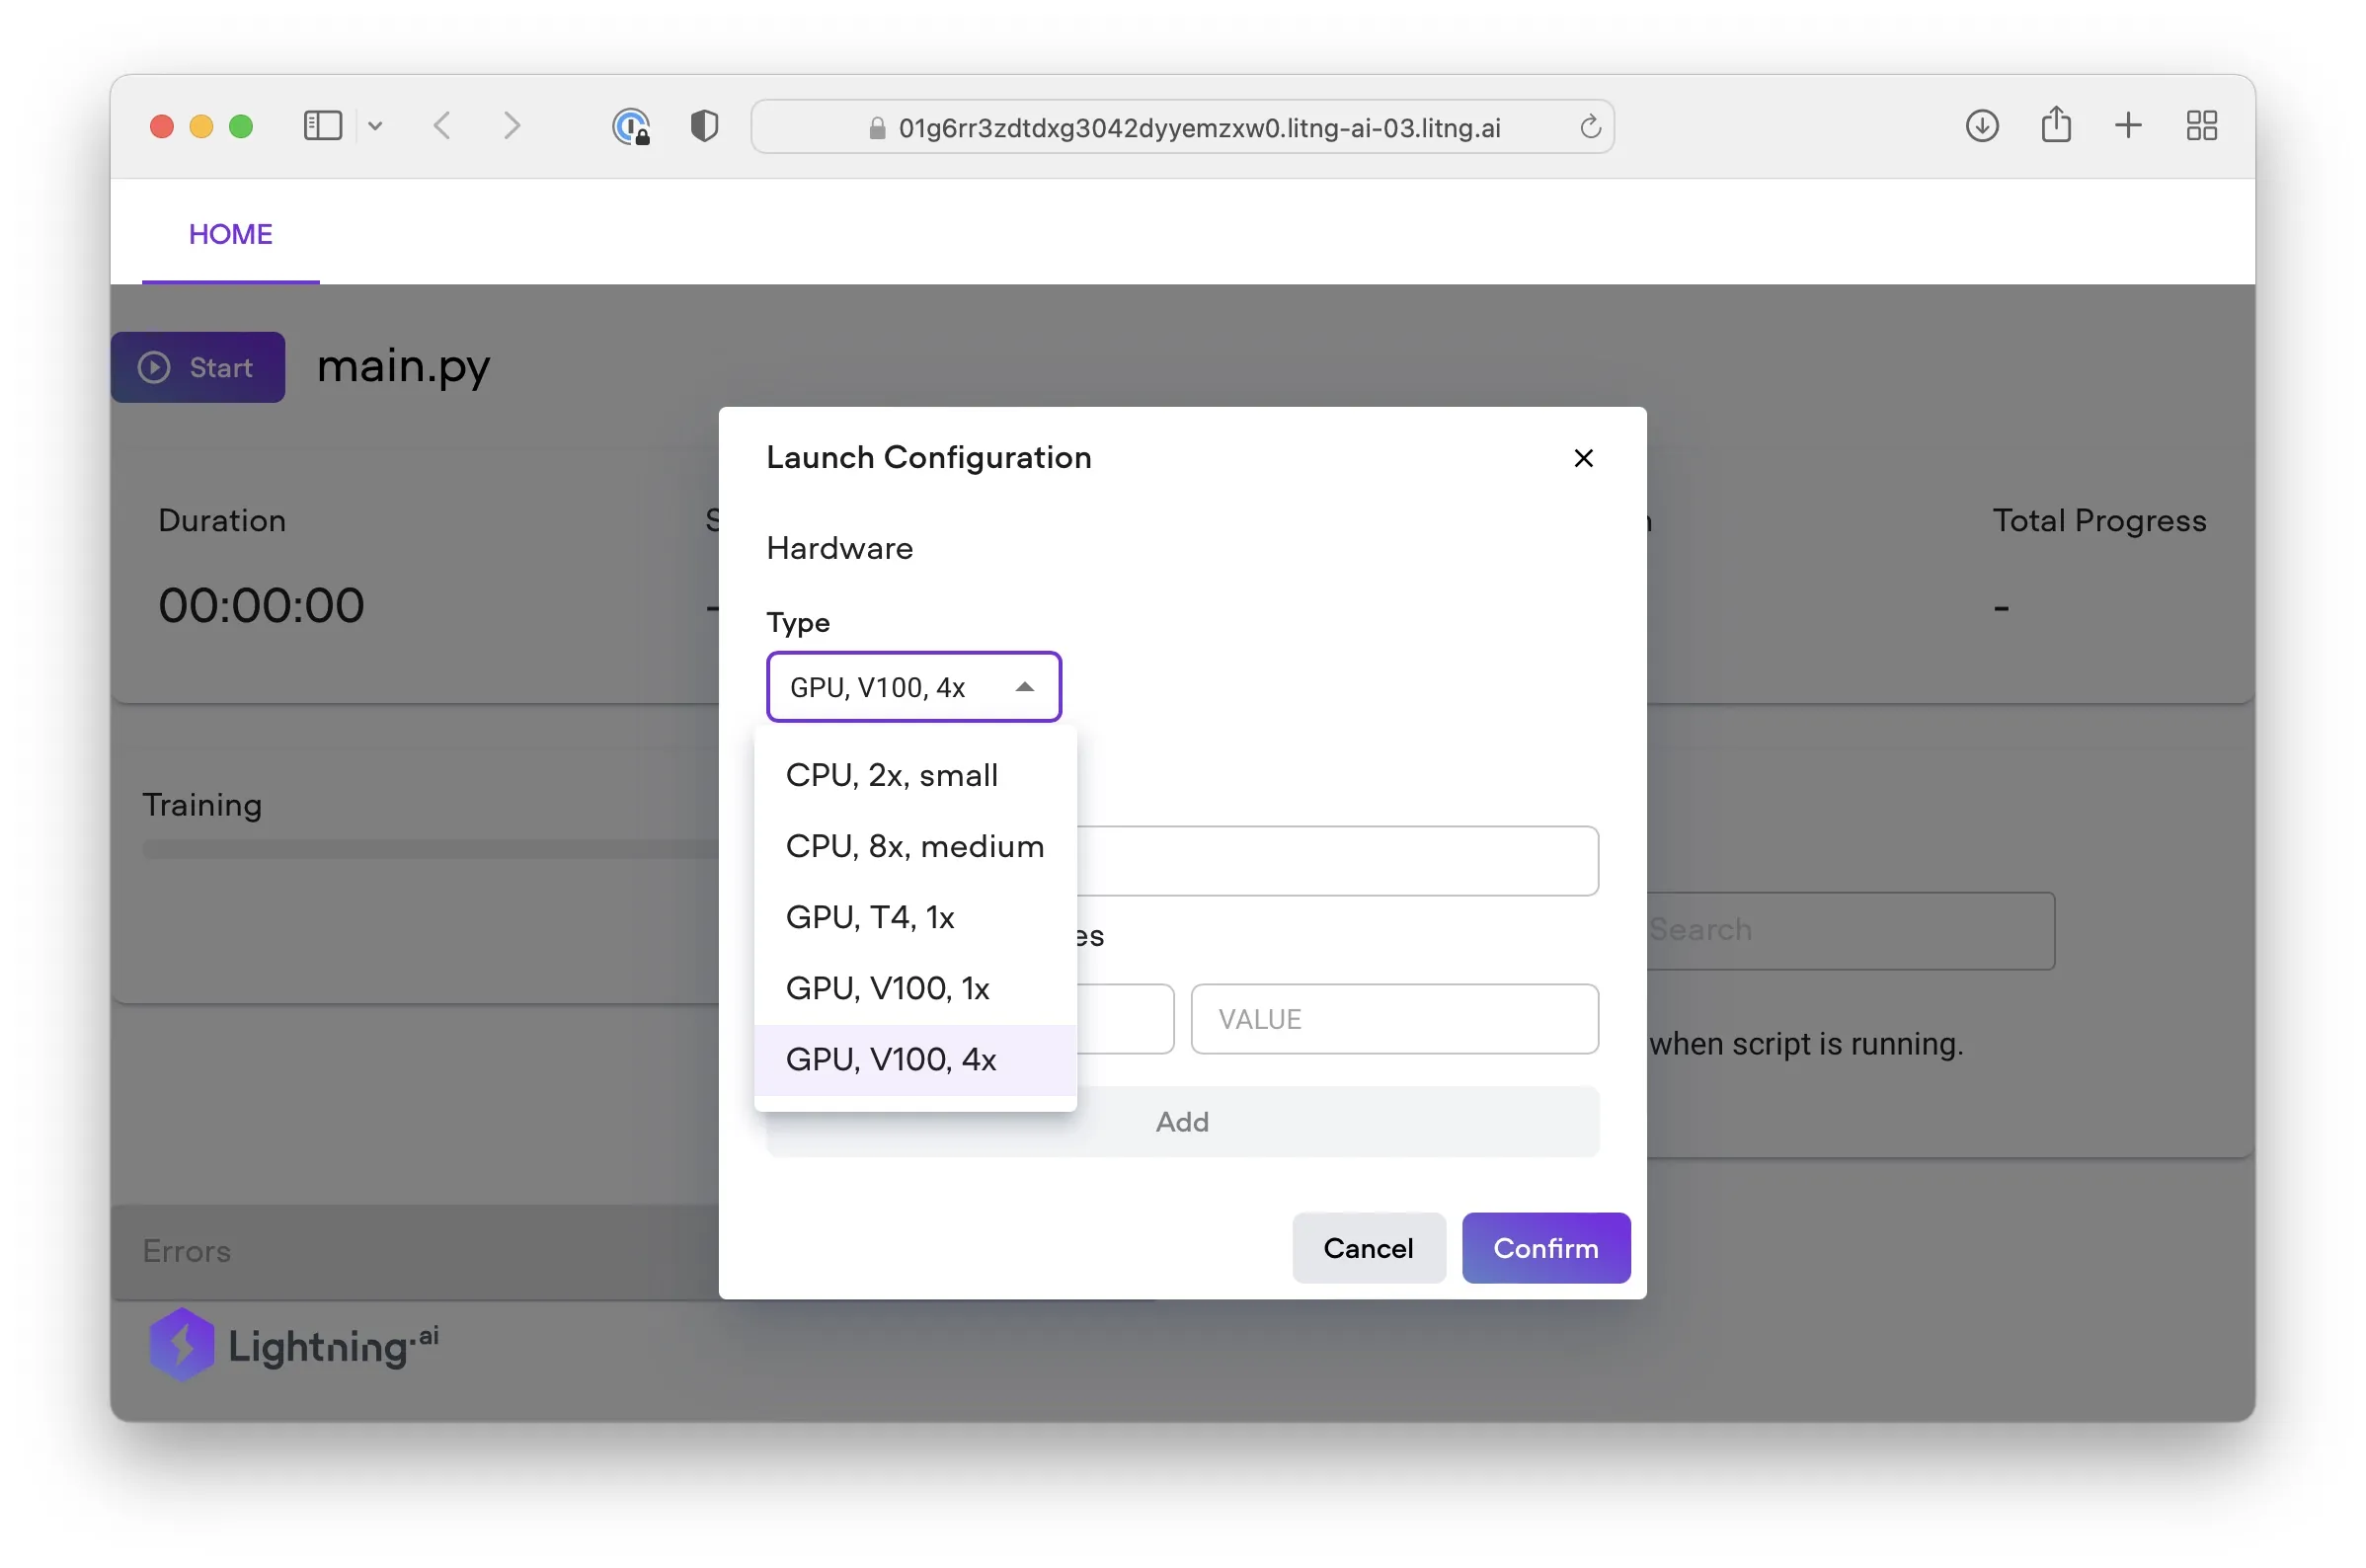
Also, as we will see in Part 2, we can run Lightning Apps in the cloud on various CPU and GPU hardware to run and even train your model. And one of the best parts is that you don’t have to write the whole App from scratch but can clone an existing one – use it as is or tailor it to your needs.
The 3 Pieces of the Core API: A Brief Overview
The core API of the Lightning Framework consists of three main Python classes:
The LightningApp is our core part of running our Lightning App either locally or on the cloud. Before we see how this works, here is a top-down summary: LightningApp runs the LightningFlow event loop, and the LightningFlow orchestrates the individual LightningWork components.
Of course, we can have multiple LightningWorks and even multiple LightningFlows. But let’s not get ahead of ourselves and start with a very simple Hello World example.
Starting with a Minimal App: Hello World
In this section, we will build a minimal Lightning App to explore the different pieces of the core API. No worries, this should be quick. And as a little reward, we will already build our first Super Resolution GAN research demo in a few minutes!
Setting Up Your Environment and Installing Lightning
If you want to follow along and try the examples on your own computer, I recommend a few quick setup steps.
As a conda user, it’s not a bad idea to create a new environment for your App (I usually recommend this for every project – check out our short episode on setting up conda environments).
Create a new environment (optional)
conda create -n helloworldapp python=3.8
conda activate helloworldapp
Installing Lightning
You can install Lightning via pip:
pip install -U lightning
Or, to use the exact same package versions I used for writing this code (Lightning 2022.6.15), just install the packages from my requirements.txt file on GitHub:
pip install -r https://raw.githubusercontent.com/rasbt/srgan-lightning-blog/main/part1-code/minimal-app/requirements.txt?token=GHSAT0AAAAAABUUA7E2554ZP6274D4K6YEYYVKI2BA
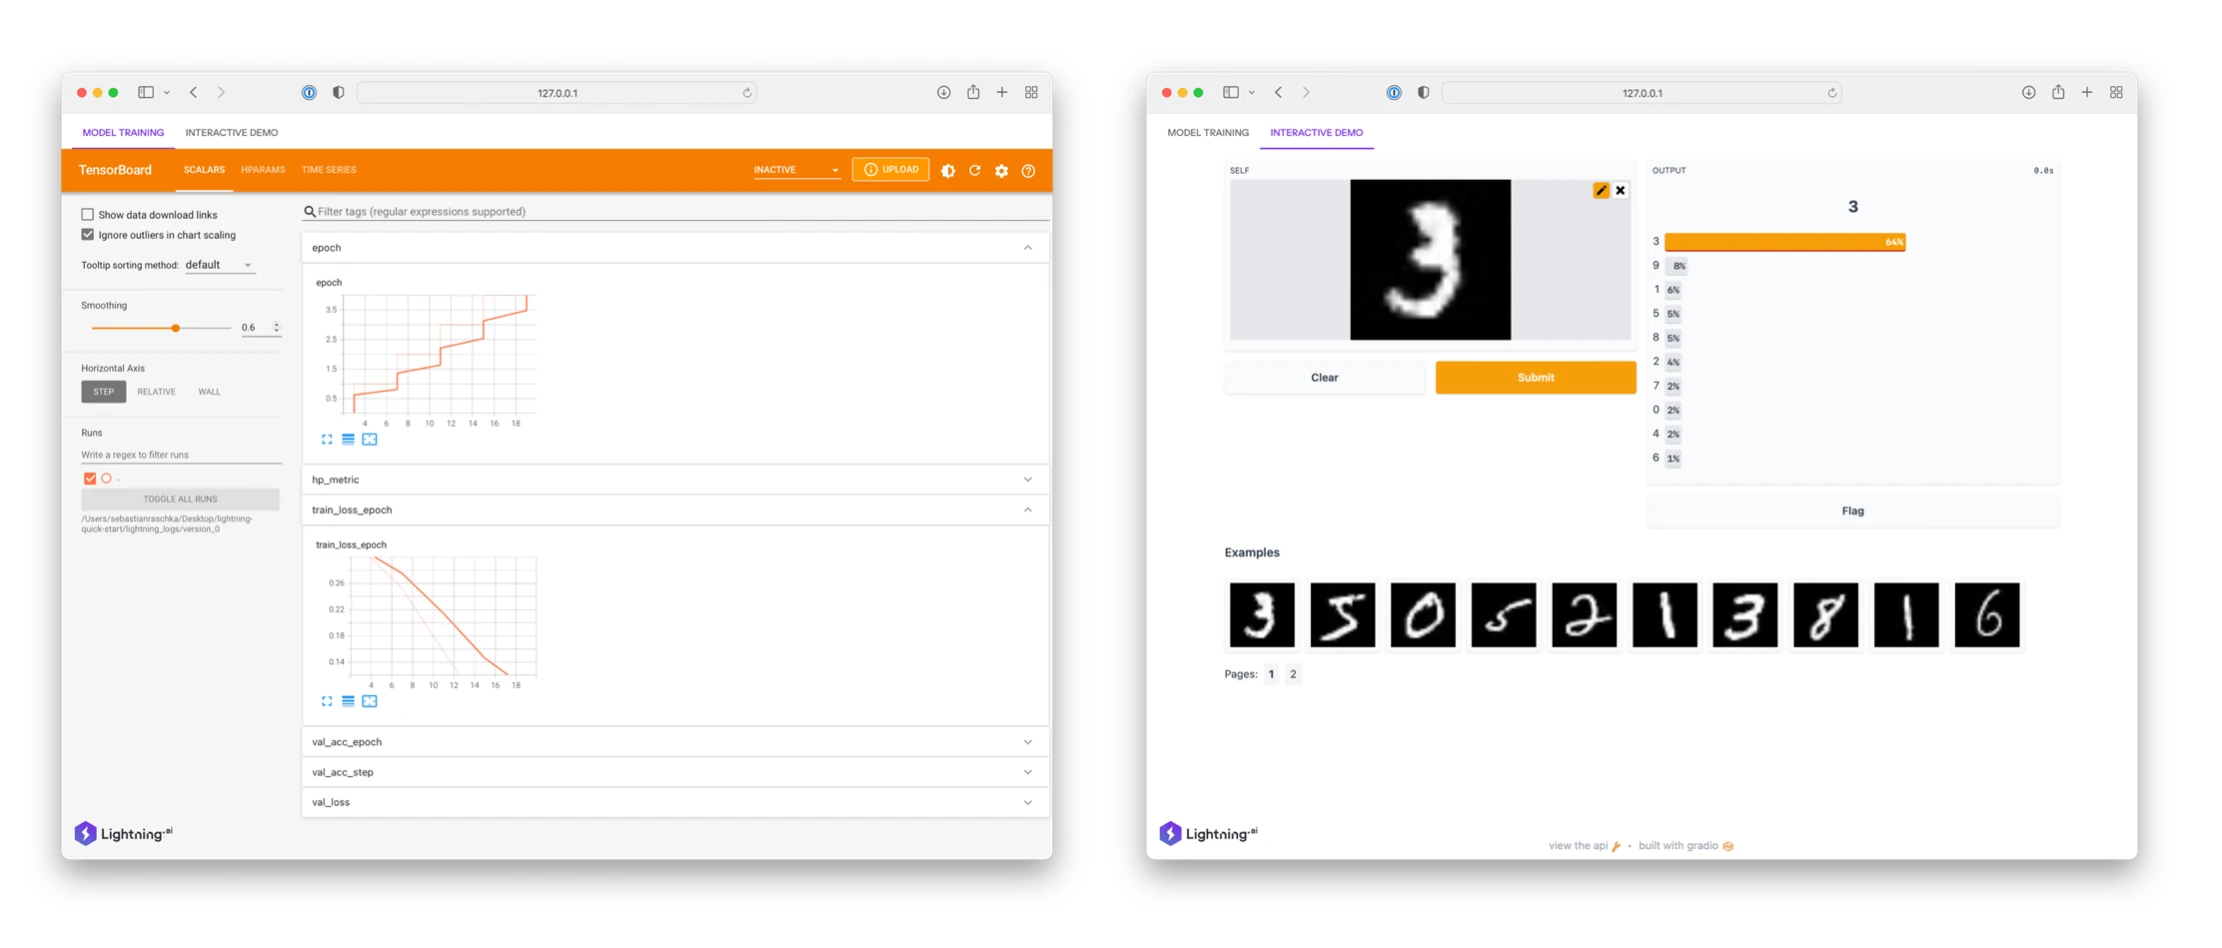
I also recommend checking out the official Lightning docs for additional info along with the 15 minute Quickstart guide with an App that trains and demos a PyTorch Lightning model:
Developing a Minimal App
In this section, we will take a bottom-up approach and create a very simple Hello World App from scratch to understand the core pieces of the Lightning API.
Note
In practice, you typically don’t have to build Apps from scratch. You can go to the App Gallery and find similar Apps that you could clone and modify. Lightning also has a template builder to get started:
lightning init app your-app-name
So, let’s take a look at our minimal Hello World App:
import lightning as L


class WordComponent(L.LightningWork):
    def __init__(self, word):
        super().__init__()
        self.word = word

    def run(self):
        print(self.word)


class MyRootComponent(L.LightningFlow):
    def __init__(self):
        super().__init__()
        self.hello = WordComponent("Hello")
        self.world = WordComponent("World")
        self.counter = 0

    def run(self):
        self.counter += 1
        if self.counter <= 6:
            print("I just go with the Flow!")
        self.hello.run()
        self.world.run()


app = L.LightningApp(MyRootComponent())
(You can find the code for this App here.)
LightningApp
Discussing the code literally from the bottom up, the LightningApp sits at the core of an Lightning App. It’s essentially running an infinite event loop over our root LightningFlow component. However, note that the line
app = L.LightningApp(MyRootComponent())
does not actually run the App, yet. We will run it soon, after taking a brief look at the core pieces of our code.
LightningFlow
In the App above, we defined MyRootComponent, which is a LightningFlow. A LightningFlow is a core component that coordinates one or more LightningWork components (and optionally other LightningFlow subcomponents.)
In short, the aforementioned LightningApp executes the .run() method of MyRootComponent in an infinite loop.
In this particular case, we start with a boring run method that just increments a counter attribute by 1 each time the run method is executed. During the first 6 calls, it should print out the string "I just go with the Flow!". In addition, there are the self.hello.run() and self.world.run() calls. self.hello and self.world are LightningWork components here that we initialized in the LightningFlow’s __init__. What are LightningWork components? I am glad you asked.
LightningWork
LightningWork components allow us to define computations and processes, and it lets us integrate third-party services. We use it essentially for anything that requires some heavy lifting.
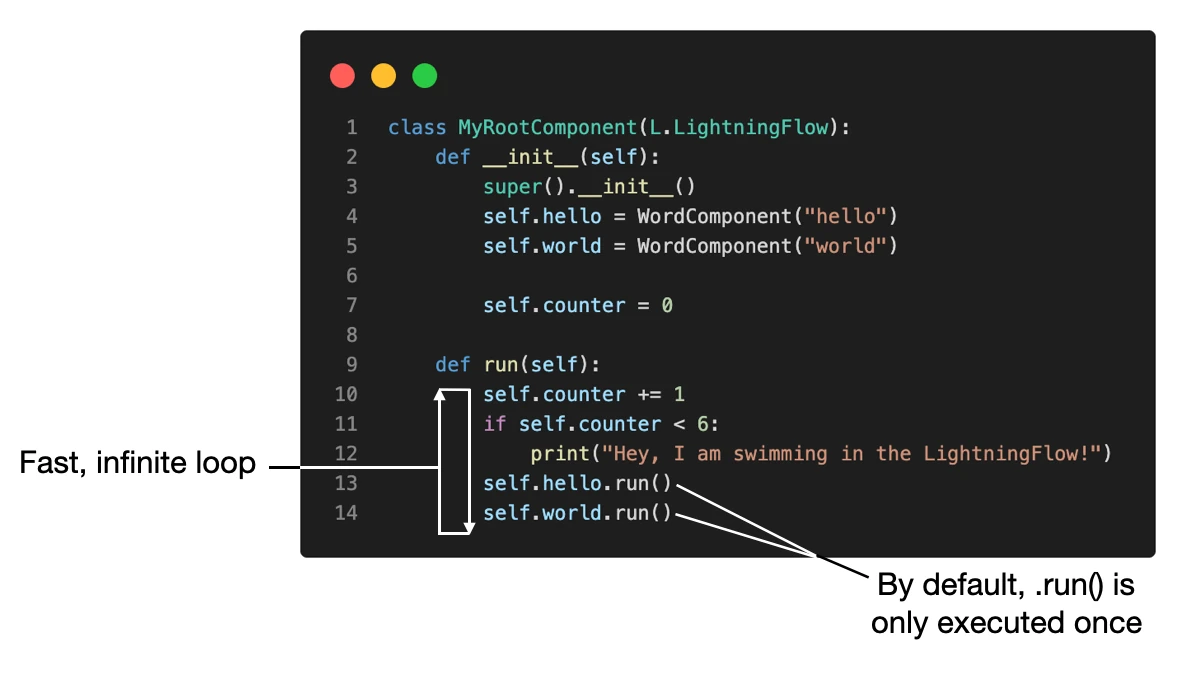
Similar to LightningFlow, LightningWork components have a run method. LightningWorks are running as independent processes and are orchestrated by the LightningFlow. To start a LightningWork process, we initialize the LightningWork component in the LightningFlow and than call their respective run methods in the LightningFlow (below is an annotated screenshot of the previous code):
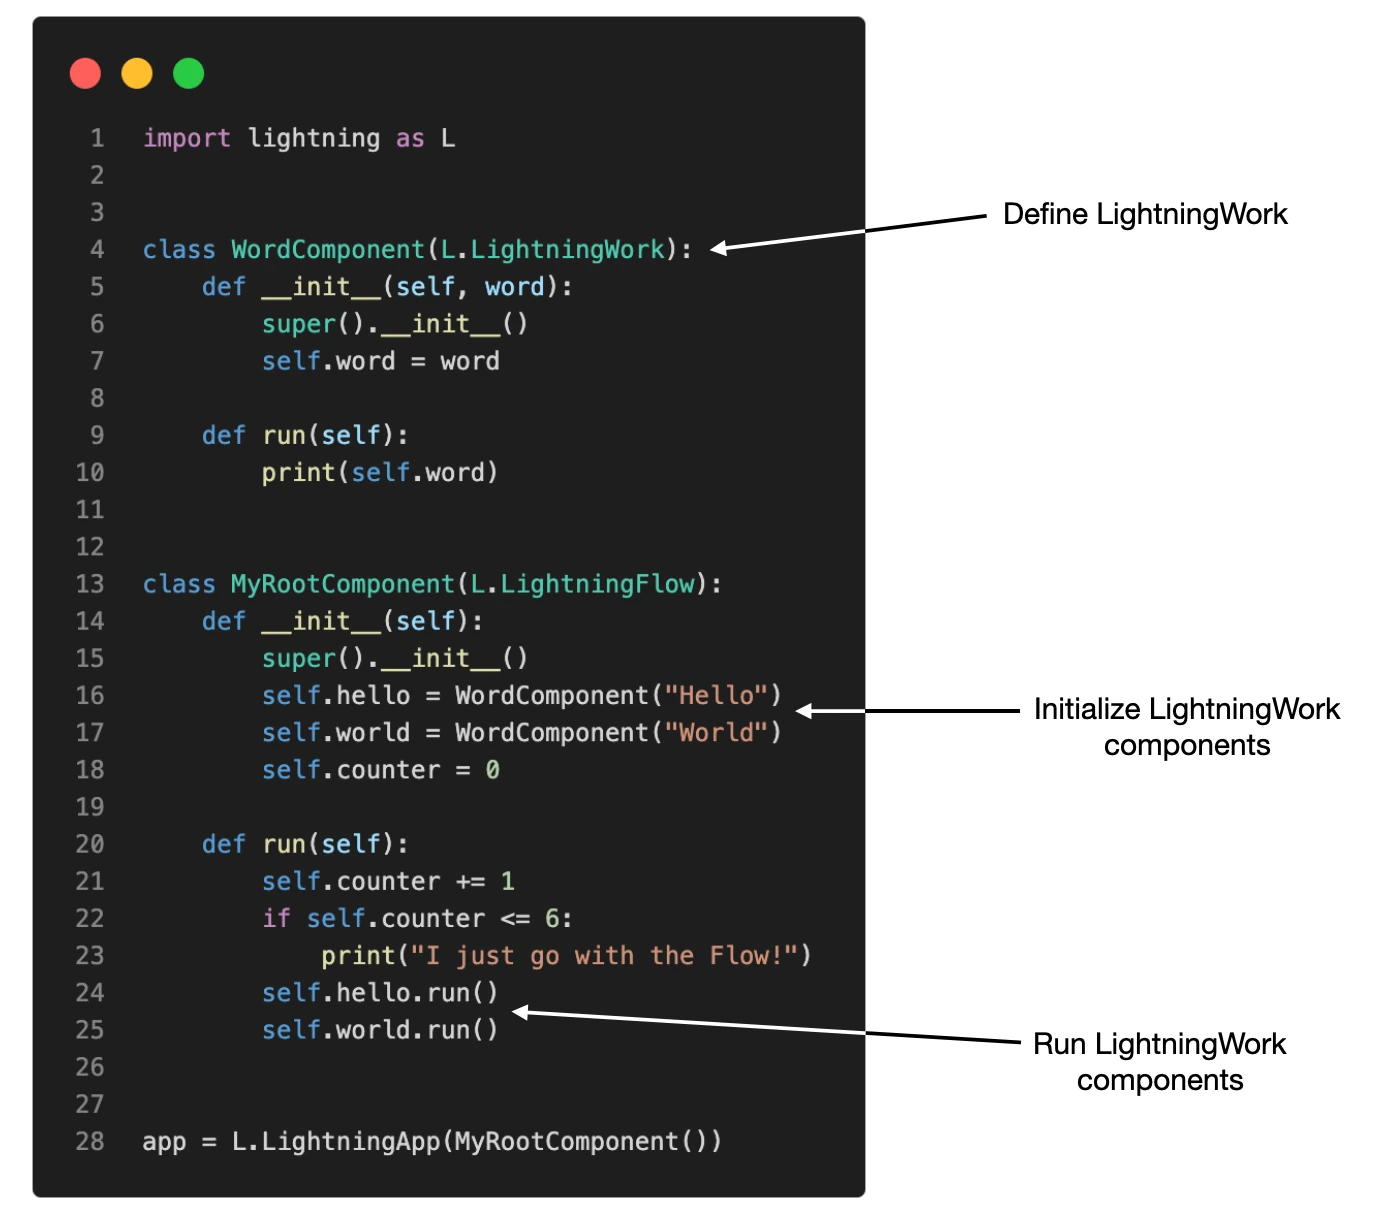
(Note that we can not only call LightningWorks from within a LightningFlow, but we can also have multiple LightningFlows in a hierarchy, as shown in the App Component tree visualization here.)
Starting the Minimal App
Now, to see how things work, let’s have a look at what happens when we start the App. If you put the code above into a file called app.py, we can start it from the terminal as follows:
lightning run app app.py
Executing the code above should open a new window in your browser. Note that for this App, there is nothing happening in the browser, yet – we will get to that later. We can see the following code output in the terminal though:

I bet this output looks different from what you expected. So, what is happening?
First, why are all six iterations of “I just go with the Flow” printed before “Hello” and “World”? That’s because the LightningFlow for-loop runs really, really fast. Or, in other words, there is a little overhead in firing up the independent run processes for the workers, the main loop is able to print out all six “I just go with the flow” statements before we see “hello.” (Thanks Josh Starmer for asking clarifying questions and providing feedback!)
Second, why are both hello and world only printed once? The LightningFlow runs a very fast, infinite loop within the run method. However, the LightningWork components (WordComponent) are only executed once by default.
This is useful, for example, if we implement an App with a component for model training (we only want to do it once) before deploying it with another component. However, in some instances, we want to override this behavior, which we can by modifying our component as shown below:
class WordComponent(L.LightningWork):
    def __init__(self, word):
        super().__init__(parallel=True, cache_calls=False)  # <-- updated
        self.word = word

    def run(self):
        print(self.word)
By default, the LightningWork components are only executed once unless their input arguments change. To override this setting, we set cache_calls=False. However, what would happen then is that in our previously defined LightningFlow, self.hello.run() would just keep running and running without giving self.world.run() a chance to run
class MyRootComponent(L.LightningFlow):
    def __init__(self):
        super().__init__()
        self.hello = WordComponent("Hello")
        self.world = WordComponent("World")
        self.counter = 0

    def run(self):
        self.counter += 1
        if self.counter <= 6:
            print("I just go with the Flow!")
        self.hello.run()   # <-- never exits without `parallel=True`
        self.world.run()
So, in addition to cache_calls=False we also set parallel=True in the WordComponent. Let’s give this updated App a try and see what happens!
(The full code for this App can be found here.)
As we can see, the output now alternatives between Hello and World – to independent processes that are orchestrated via the LightningFlow.
As an additional exercise, I encourage readers to play with all 4 combinations:
-
parallel=False, cache_calls=True(Default setting. Our setting inapp.py) parallel=False, cache_calls=Falseparallel=True, cache_calls=True-
parallel=True, cache_calls=False(Our setting inapp2.py)
For fairness, our Hello World App is not a very typical App. For example, in a real-world scenario, your self.hello component could be a training script, and self.world could contain the instructions for deploying our model. This way, the deployment would not happen before the model finished training.
While the above code examples were rather boring, I hope they helped illustrate the broader concepts of the Lightning Framework. I promise you that the next section is going to be a tad more interesting, as we are going to build a Super Resolution GAN research demo.
Q&A: LightingFlow vs LightningWork – When to Use Which?
LightningFlows are really just for the orchestration. Any major computation should happen in a LightningWork component.
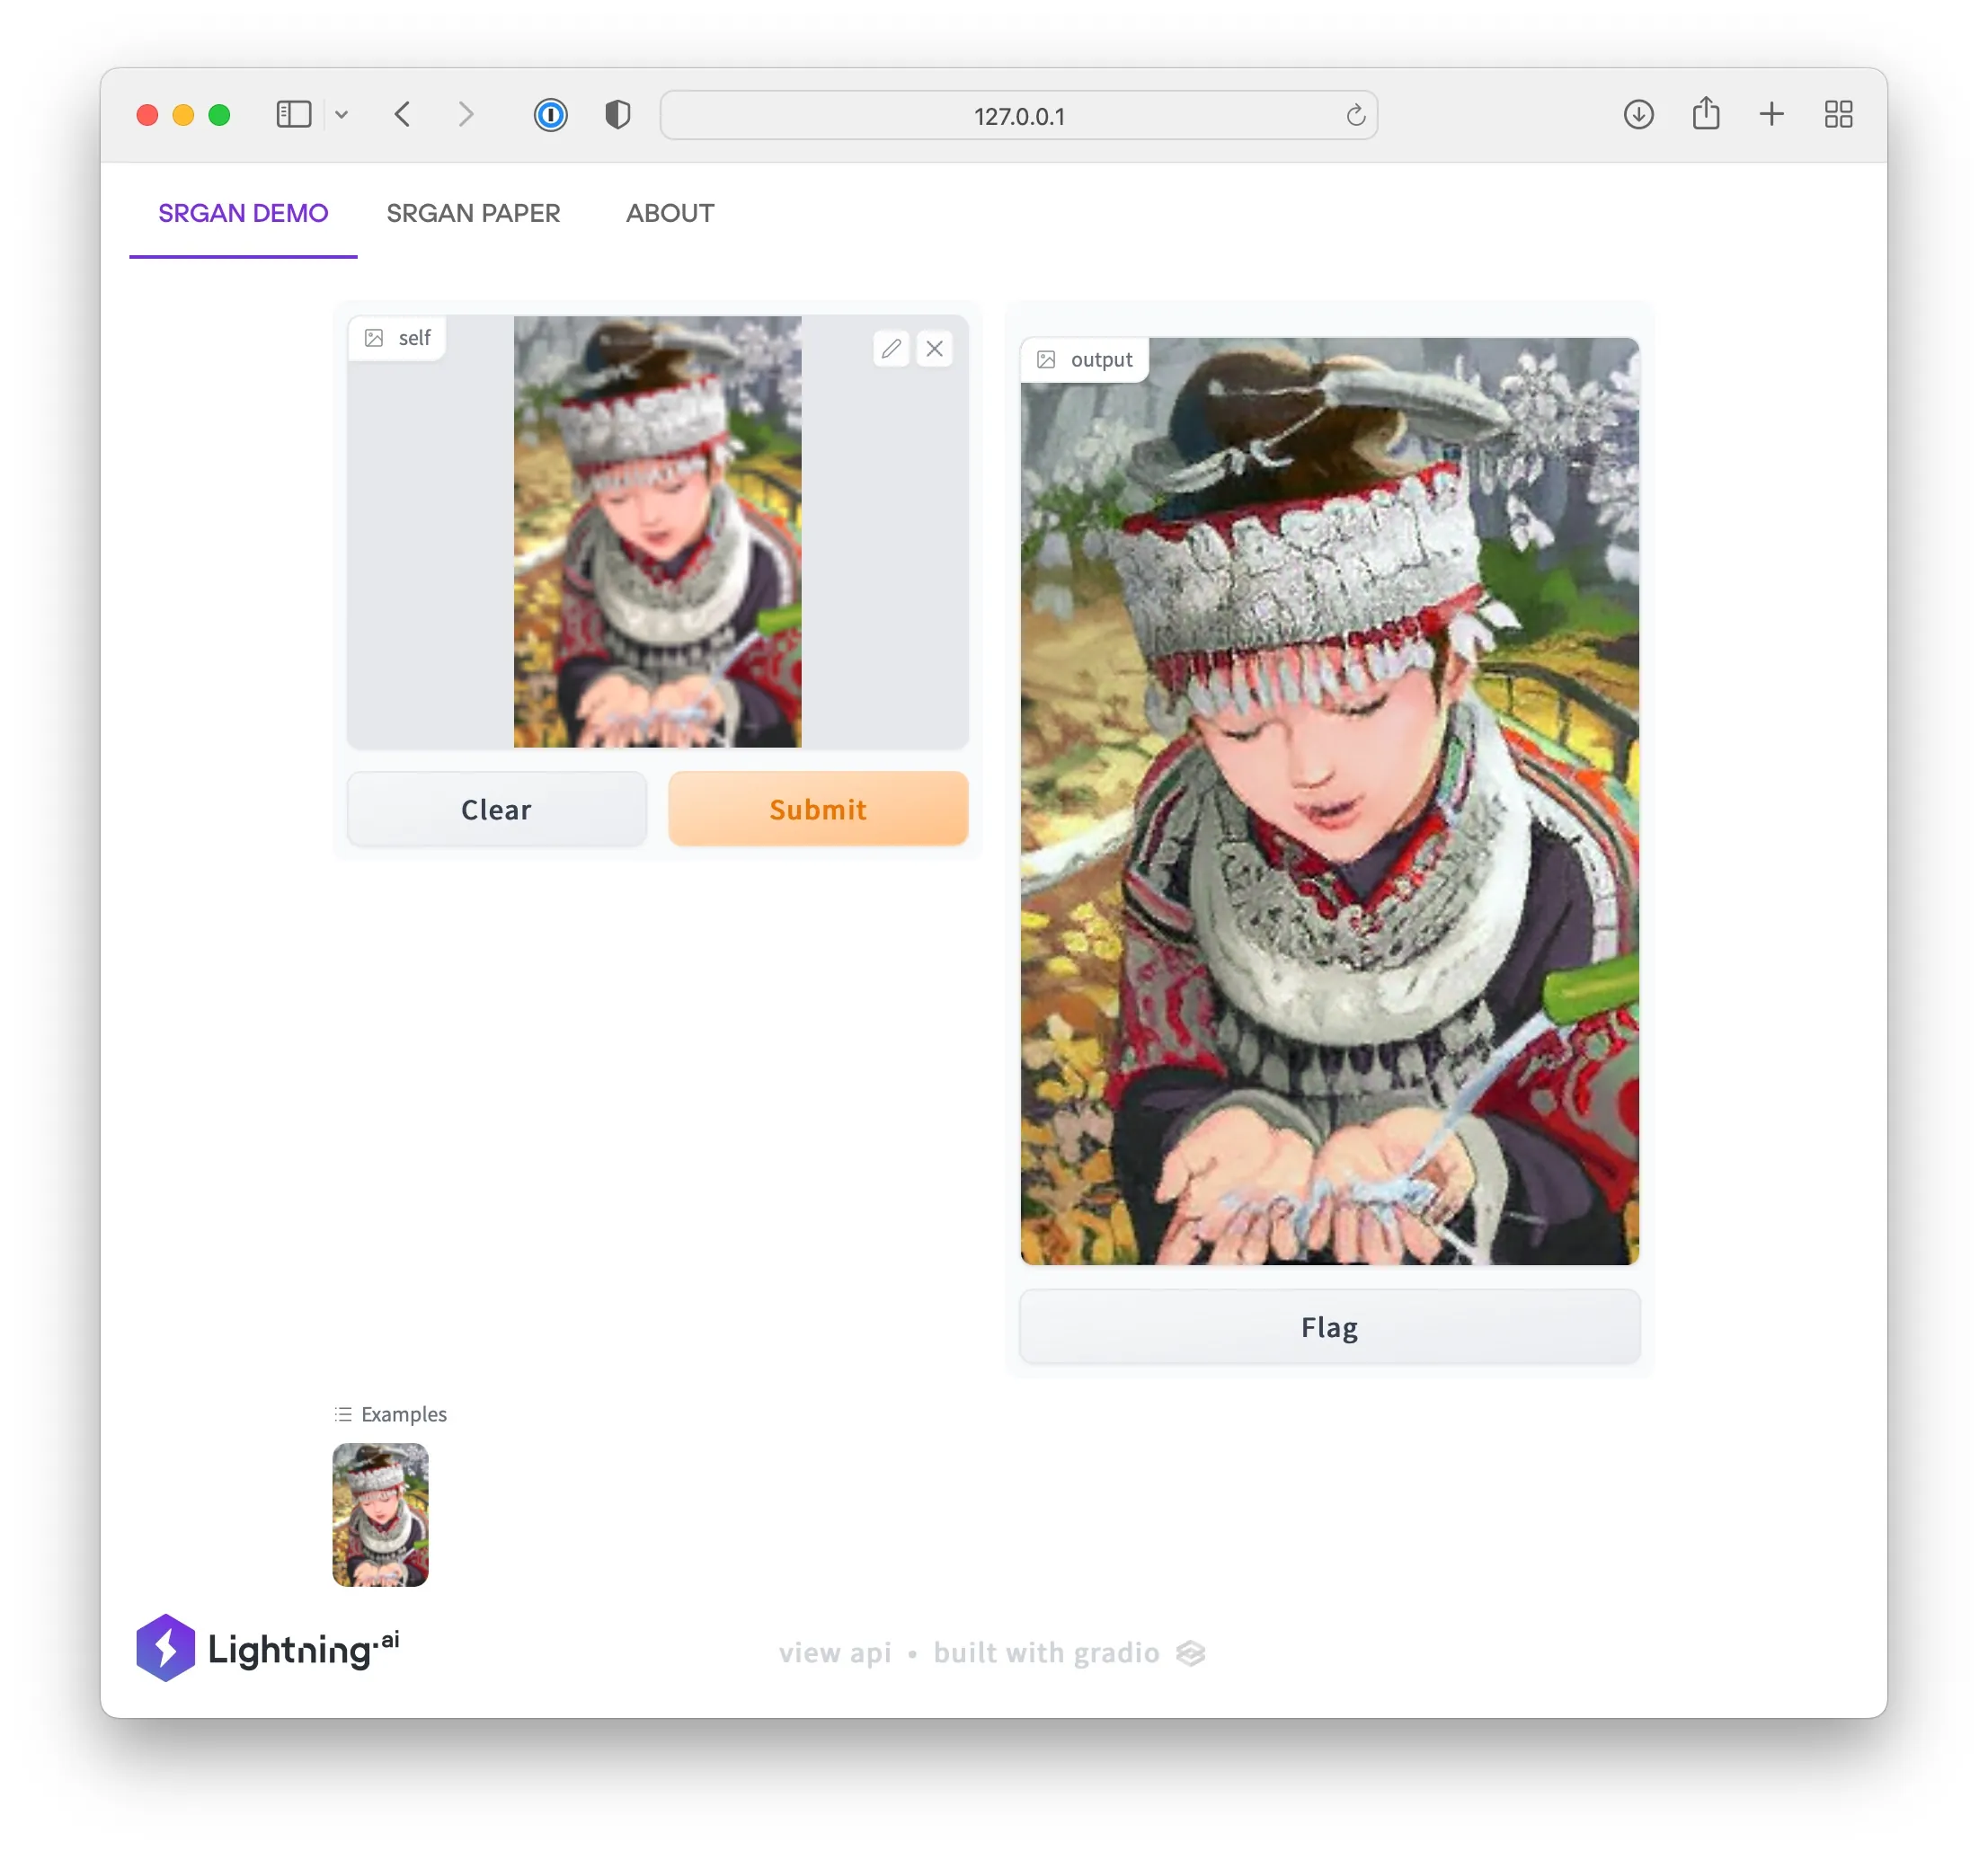
Developing A Super Resolution App
In this section, we are building a simple research demo. For this, we will use a Super Resolution GAN implementation in PyTorch. But, of course, this could be your own model in the real world. And you could also make the model training part of the Lightning App (as it is done in the PyTorch Lightning App.)
Setting Up the File Structure
For simplicity and to focus more on understanding how we can build a simple, custom Lighting App, we will use the Super Resolution GAN from this GitHub repo. (Why this repo? This was really just an arbitrary choice; I just searched for “Superresolution GAN,” and this is what came up.)
So, since we are not training the model but just running it in inference mode, we only need a few files from this repository: the image processing code, the model itself, and the model weights.
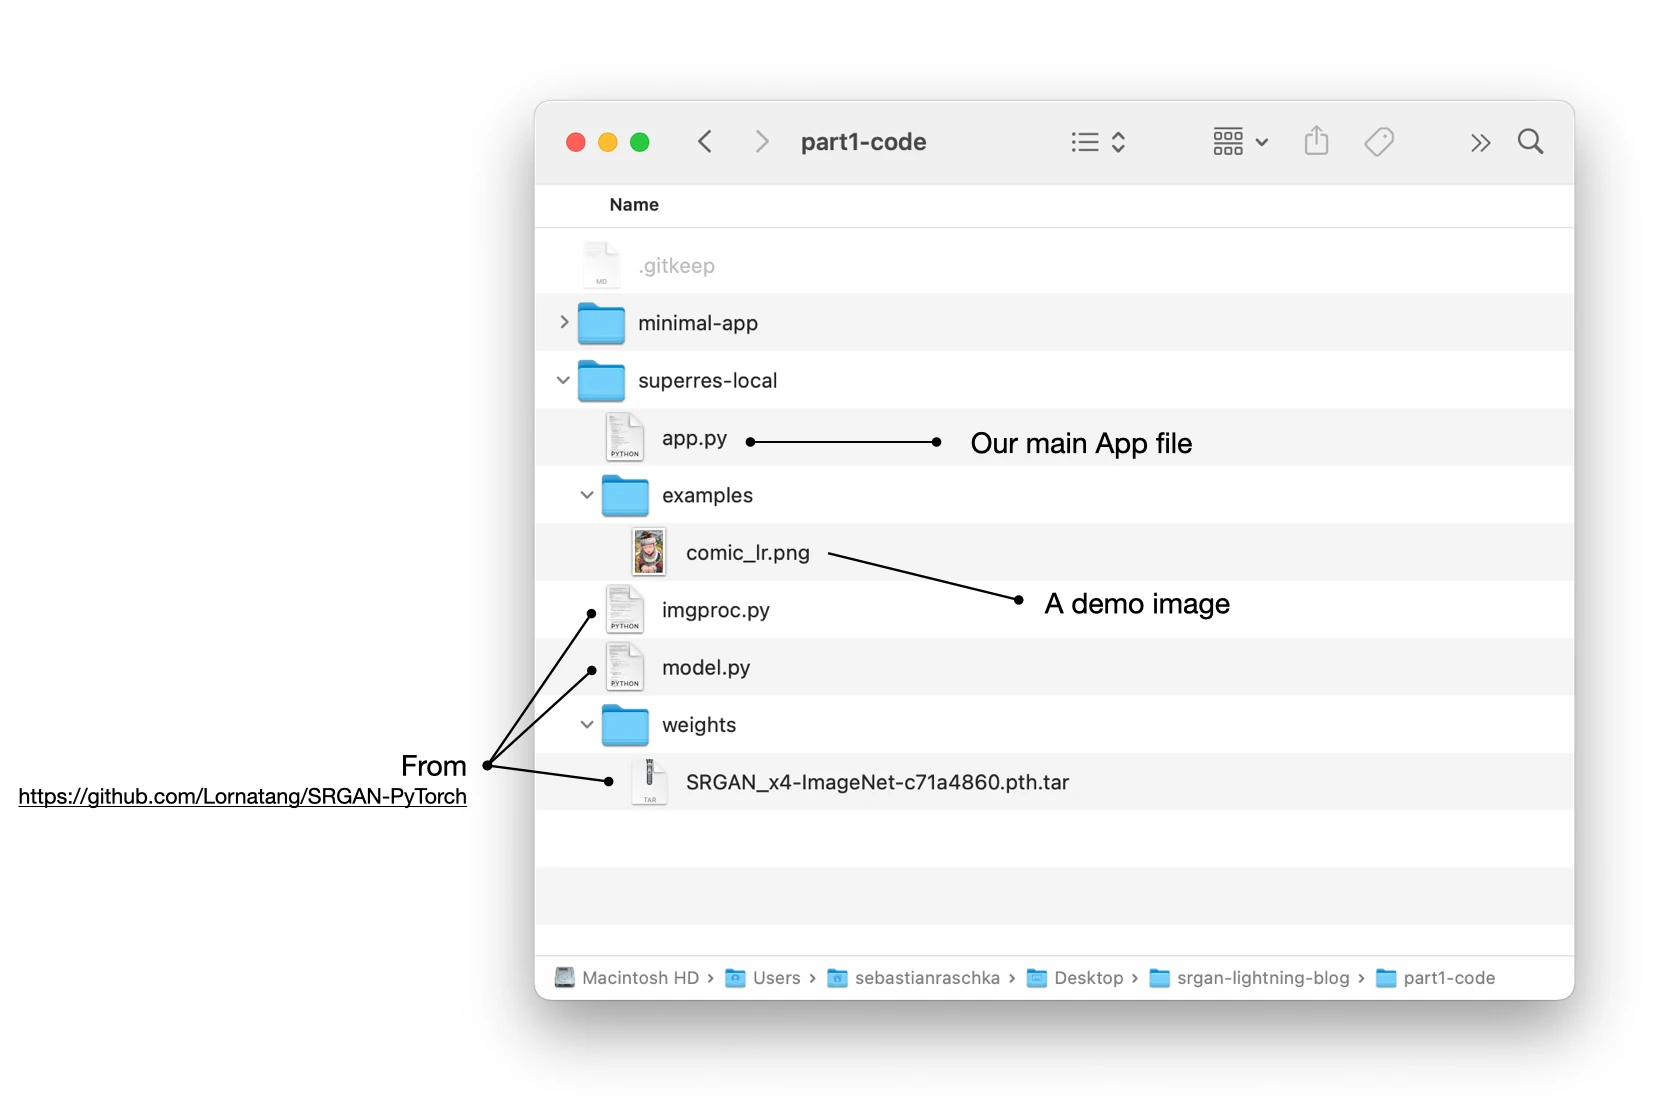
The App we are going to build should have three tabs:
-
The demo interface (here, we use Gradio for that);
-
A tab linking to the research paper;
-
A simple “About” page.

We will see how to code this App in the next section.
Creating the App.py file
In this section, we are going to discuss the contents of the app.py file. However, we are going to do that a bit out of order, so I recommend checking out the full code on GitHub here.
RootFlow
Let’s take a look at the RootFlow first:
class RootFlow(L.LightningFlow):
    def __init__(self):
        super().__init__()
        self.demo = SRGAN()
        self.about_page = ChildFlow()

    def run(self):
        self.demo.run()

    def configure_layout(self):
        tab_1 = {"name": "SRGAN Demo", "content": self.demo}
        tab_2 = {
            "name": "SRGAN Paper",
            "content": "https://arxiv.org/pdf/1609.04802v5.pdf",
        }
        tab_3 = {"name": "About", "content": self.about_page}
        return tab_1, tab_2, tab_3


app = L.LightningApp(RootFlow())
In the __init__ constructor, we specify two components:
-
self.demo = SRGAN(), which is a LightningWork responsible for the model loading and prediction. -
self.about_page = ChildFlow(), which is LightningFlow for rendering an About page.
In the configure_layout method, we specify 3 tabs for our App: The main demo page, a link to the SRGAN research paper, and the project About page.
In the run method, we execute the SRGAN work component, which we will look at in a second.
SRGAN Work Component
Let’s now look at the SRGAN class that is used to build the demo in our RootFlow above: self.demo = SRGAN().
A note about simplifying model code with TorchHub
The code might look a bit involved, but that’s because we need a couple of lines to use the SRGAN model. If the SRGAN was PyTorchHub-compatible, we could save a few lines of code here and just load it like we use other recent research models. But making models PyTorchHub-compatible is a topic for another day.
model = torch.hub.load('facebookresearch/deit:main', 'deit_base_patch16_224', pretrained=True)
model.predict(...)
The SRGAN code below subclasses from ServeGradio, which is a LightningWork component for Gradio:
import cv2
import gradio as gr
from lightning.app.components.serve import ServeGradio
import torchvision.transforms as T

# Local files:
import imgproc
from model import Generator

class SRGAN(ServeGradio):

    inputs = gr.inputs.Image(type="pil", label="Select an input image")  # required
    outputs = gr.outputs.Image(type="pil")  # required
    examples = ["./examples/comic_lr.png"]  # required

    def __init__(self):
        super().__init__()
        self.ready = False  # required

    def predict(self, img):

        DEVICE = torch.device("cpu")

        # resize image
        height, width = img.size
        print("Original size:", height, width)
        max_size = max(height, width)
        if max_size > 100:
            ratio = 100 / max_size
            new_size = (round(ratio * height), round(ratio * width))
            img = img.resize(new_size)

        new_height, new_width = img.size
        print("Resized size:", new_height, new_width)

        # convert image to tensor
        opencv_image = np.array(img)
        opencv_image = opencv_image[:, :, ::-1].copy()
        lr_image = opencv_image.astype(np.float32) / 255.0
        lr_image = cv2.cvtColor(lr_image, cv2.COLOR_BGR2RGB)
        lr_tensor = imgproc.image2tensor(lr_image, False, False).unsqueeze_(0)
        lr_tensor = lr_tensor.to(device=DEVICE)

        # get upscaled image
        with torch.no_grad():
            sr_tensor = self.model(lr_tensor)
        transform = T.ToPILImage()

        # Remove batch dimension
        sr_tensor.squeeze_(0)
        return transform(sr_tensor)

    def build_model(self):
        WEIGHTS_PATH = "./weights/SRGAN_x4-ImageNet-c71a4860.pth.tar"
        DEVICE = torch.device("cpu")

        # Initialize the model
        model = Generator()
        model = model.to(memory_format=torch.channels_last, device=DEVICE)
        print("Build SRGAN model successfully.")

        # Load the SRGAN model weights
        checkpoint = torch.load(WEIGHTS_PATH)
        model.load_state_dict(checkpoint["state_dict"])
        print(f"Load SRGAN model weights `{WEIGHTS_PATH}` successfully.")
        model.eval()

        return model
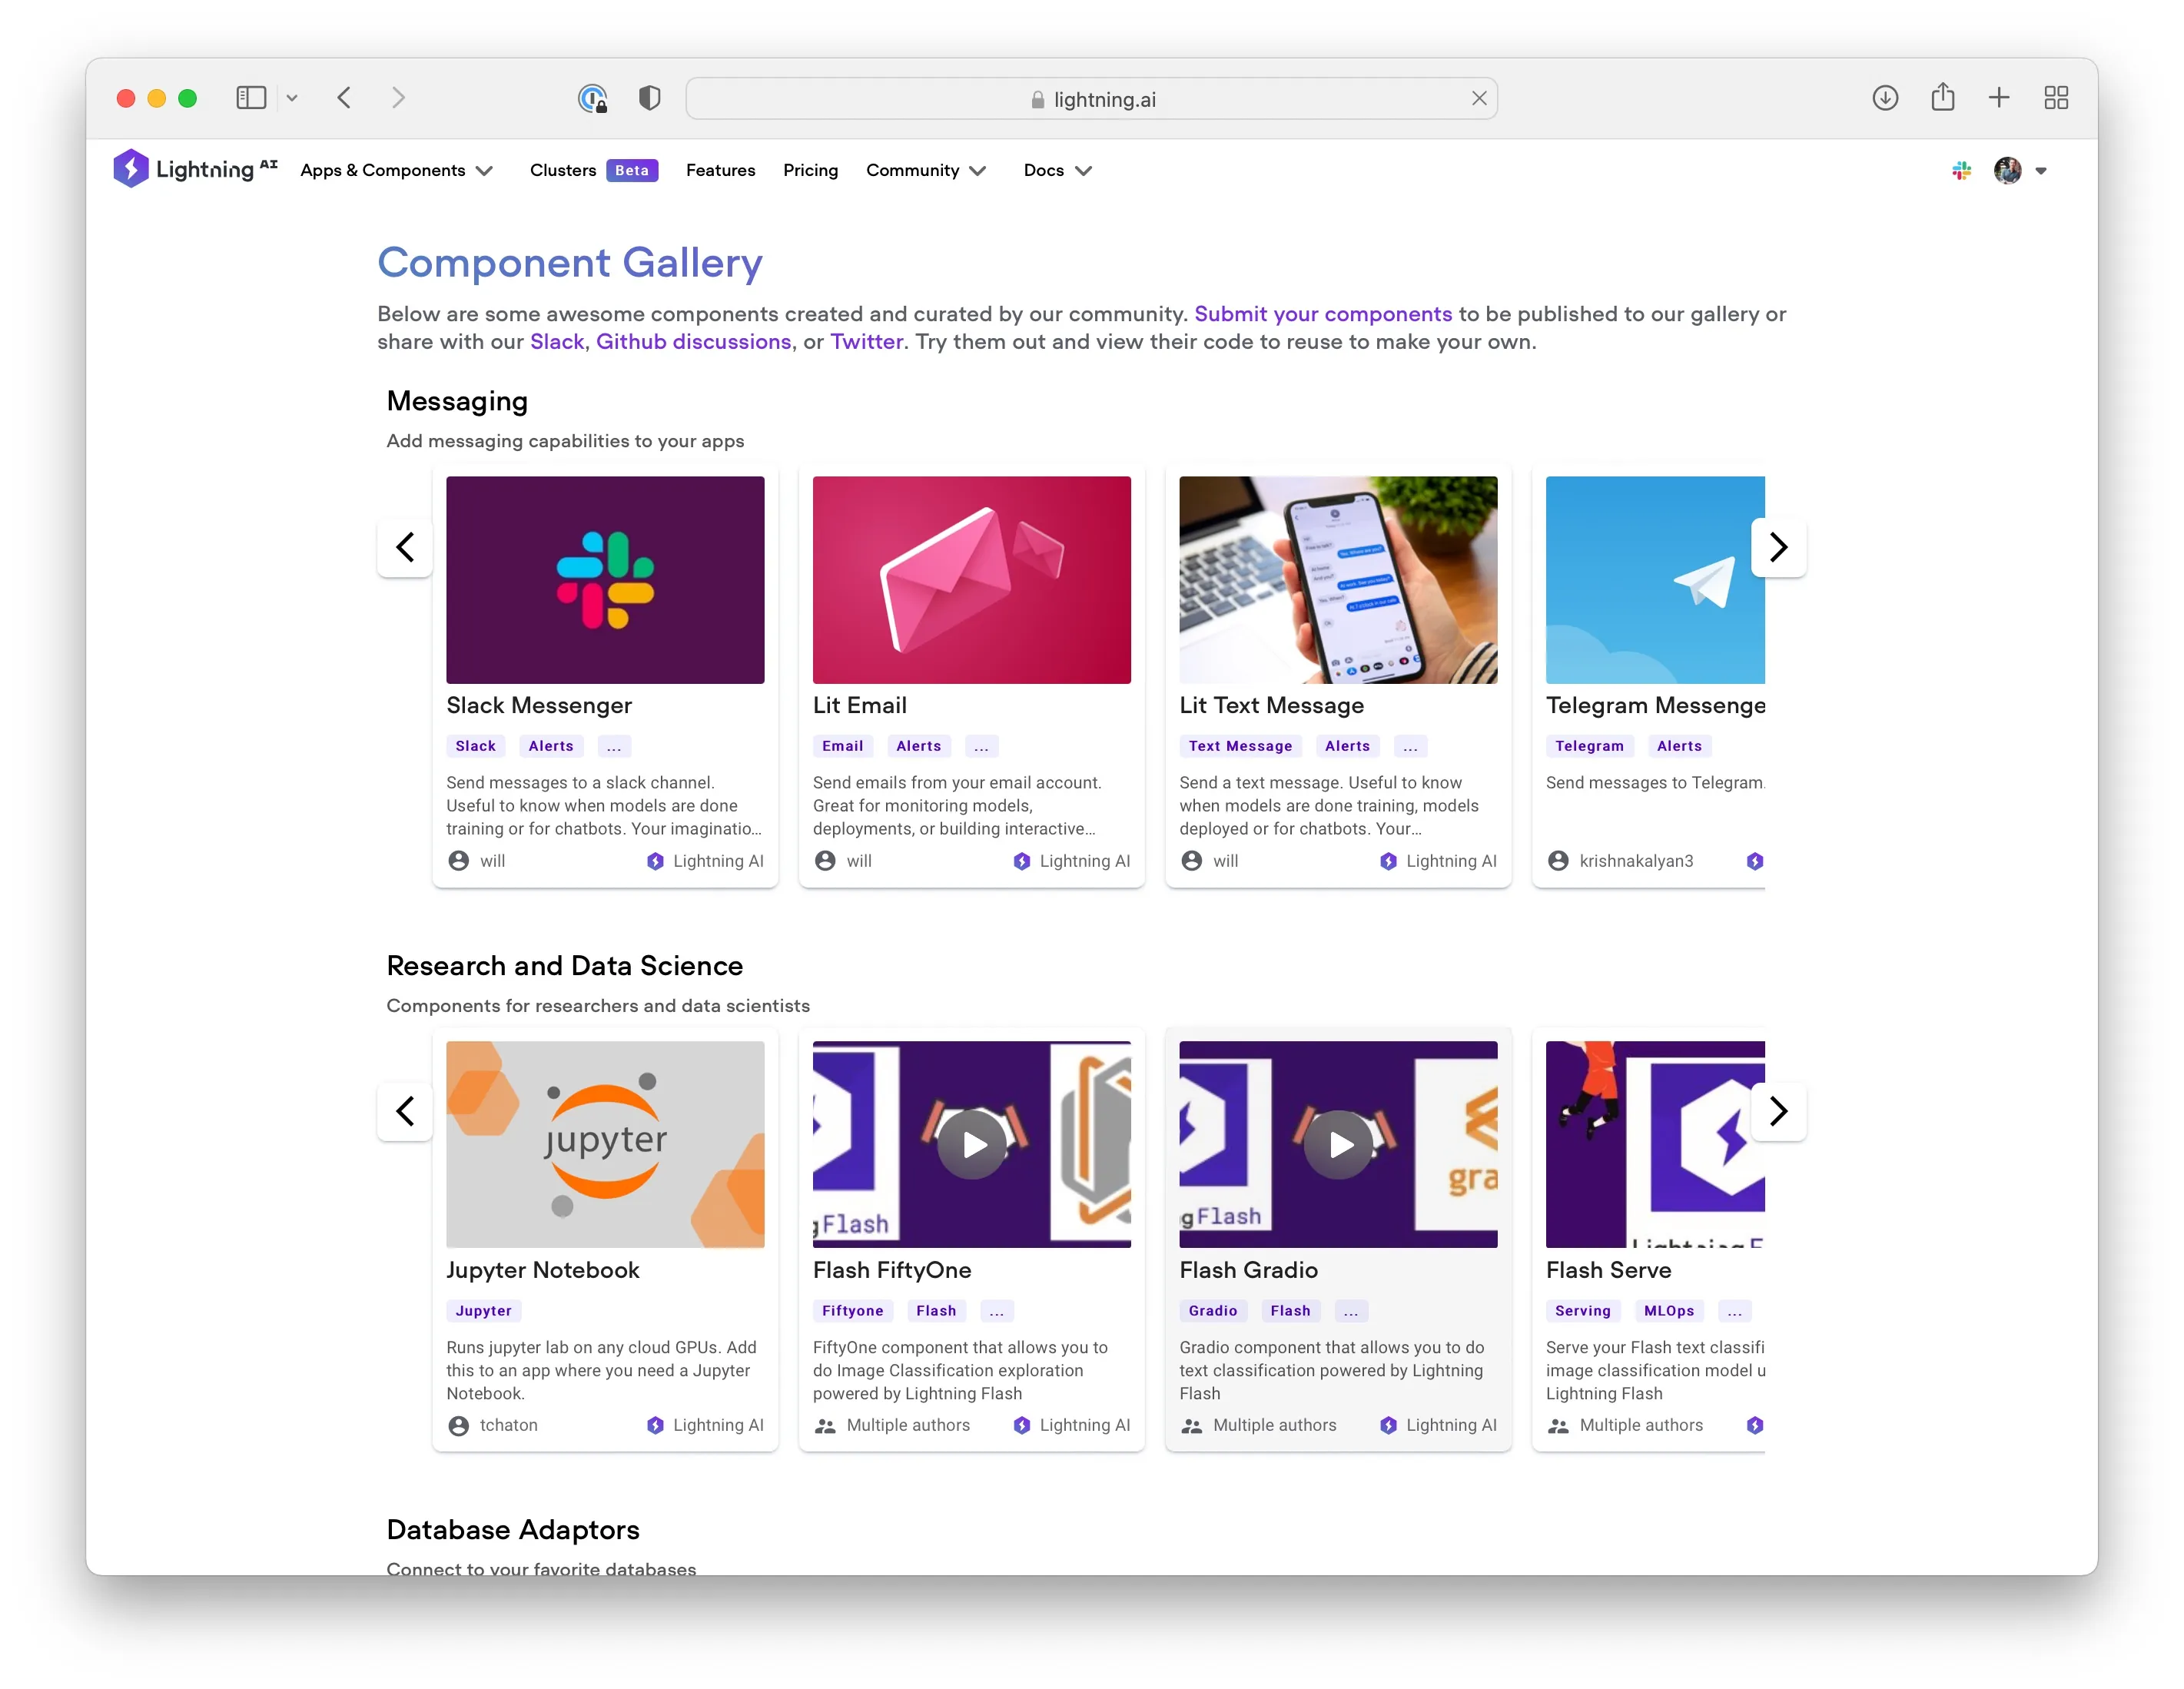
(Check out the Component Gallery to get an idea of what Components already exist. In Part 3, we will learn how to build our own component.)
The SRGAN consists of two main methods: predict and build_model.
The build_model method defines how the SRGAN model is loaded from the checkpoint path. Note that code in the build_model method depends on how the model in implemented in the SRGAN GitHub repo. Here, it’s a PyTorch model, but it’s worth emphasizing that this could be anything: a scikit-learn model, a TensorFlow model, or perhaps a Jax/Flax model. All that matters is that build_model returns a model that we can use on input data.
The predict method then uses the loaded model and runs it in inference mode to upscale the images. There is a lot of code here, which is mostly based on the code examples in the SRGAN GitHub repo. For your own model, this may be substantially simpler.
Note that I added a little section on resizing the inputs for efficiency reasons. That’s because the SRGAN implementation requires a lot of RAM for large-size input images. The resize-code rescales the input image such that the longest side (height or width) have more than 100 pixels.
The lines at top of the SRGAN class:
inputs = gr.inputs.Image(type="pil", label="Select an input image")  # required
outputs = gr.outputs.Image(type="pil")  # required
examples = ["./examples/comic_lr.png"]  # required
are specific to the ServeGradio component. In Part 3 we will make some customizations to the ServeGradio component to learn how we can adopt and develop or own components. However, before you go down that route and consider developing your own components, I recommend checking out the Component Gallery:
The About Page Frontend
In the RootFlow, we defined the about_page as a ChildFlow():
class RootFlow(L.LightningFlow):
    def __init__(self):
        super().__init__()

        self.demo = SRGAN()
        self.about_page = ChildFlow()  # <-- here!

    def run(self):
        self.demo.run()

    def configure_layout(self):
        tab_1 = {"name": "SRGAN Demo", "content": self.demo}
        tab_2 = {
            "name": "SRGAN Paper",
            "content": "https://arxiv.org/pdf/1609.04802v5.pdf",
        }
        tab_3 = {"name": "About", "content": self.about_page}  # <--
        return tab_1, tab_2, tab_3
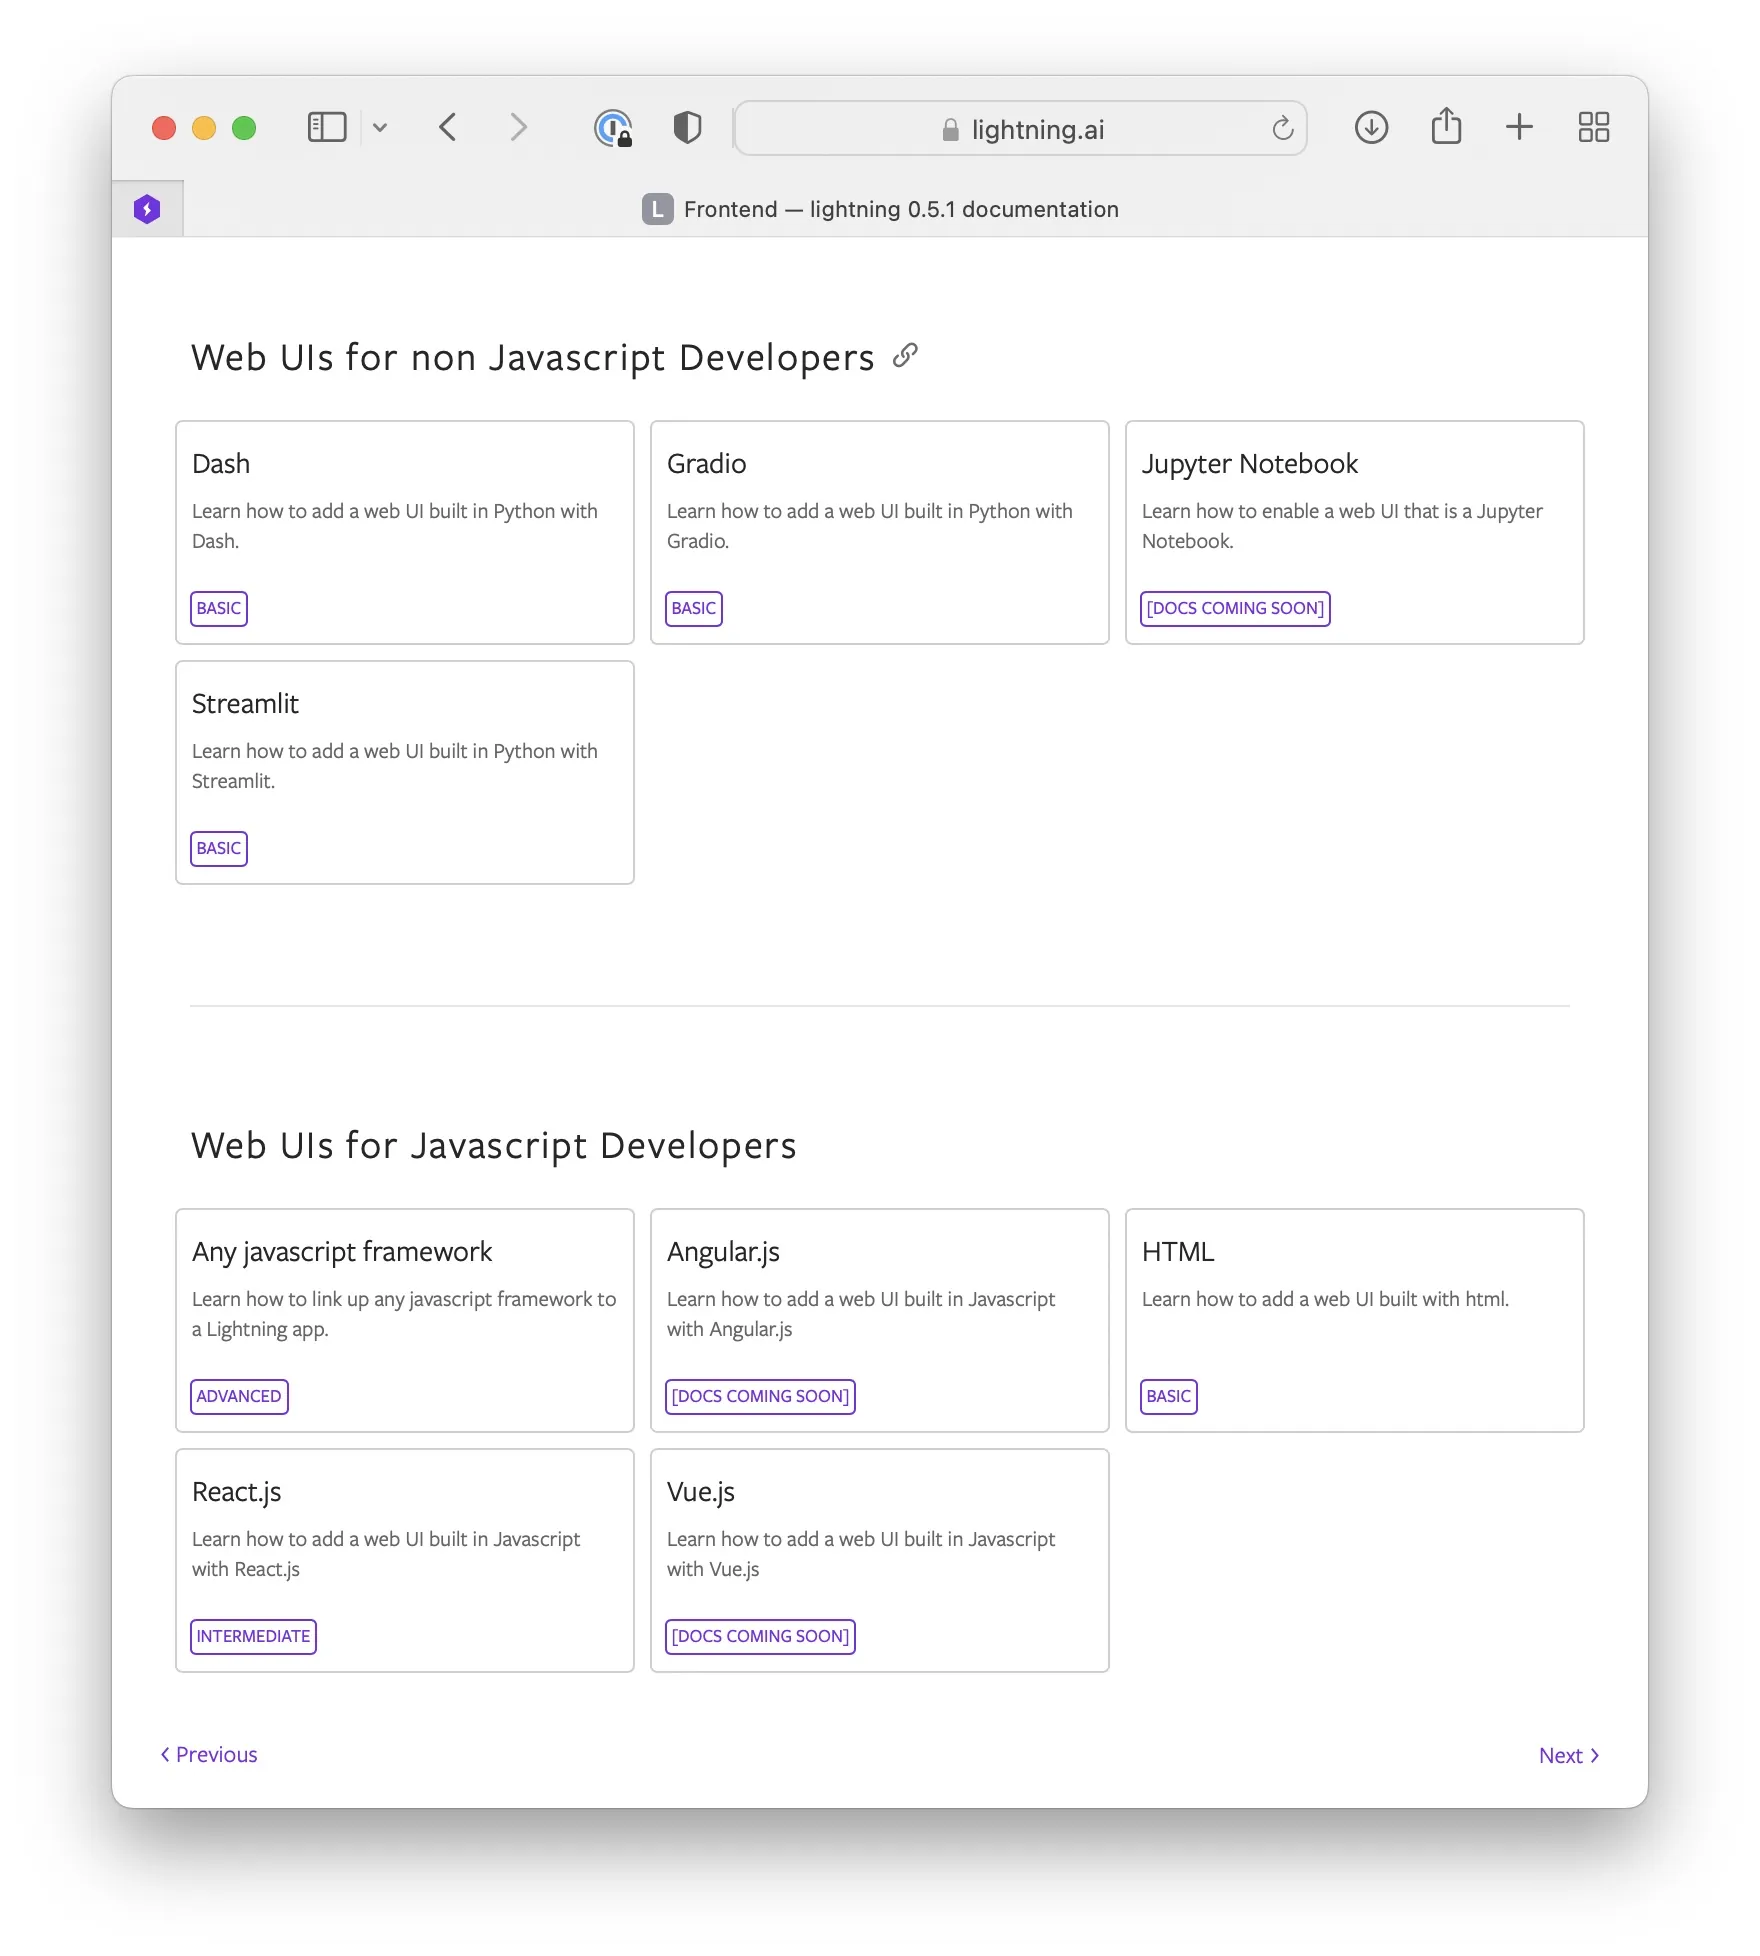
Here, the ChildFlow is a LightningFlow that configures a Streamlit frontend. If you used Streamlit before, you might think that this is overkill for just rendering a simple markdown page. However, I think it is interesting to use Streamlit here as a placeholder in case you want adopt it to build something fancier. But of course, there are also many other frontends available to choose from, from Jupyter Notebook to React.js:
The Streamlit frontend is configured as follows, where we configure the ChildFlow that is used in the RootFlow – this is also a good example that we can have multiple LightningFlow components:
def your_streamlit_app(lightning_app_state):
    static_text = """
    # SRGAN Lightning App

    This is a simple [Lightning app](https://lightning.ai) that runs
    SRGAN model based on [this](https://github.com/Lornatang/SRGAN-PyTorch)
    GitHub repository.

    If you want to learn more about Lightning Apps, checkout the official
    [lightning.ai](https://lightning.ai) website.

    If you have any questions or suggestions, you can find
    me [here](https://sebastianraschka.com) and
    [here](http://twitter.com/rasbt).
    """
    st.write(static_text)


class ChildFlow(L.LightningFlow):
    def configure_layout(self):
        return StreamlitFrontend(render_fn=your_streamlit_app)
Running the Superresolution App
Since this project involves PyTorch and OpenCV for image preprocessing steps, we will have to install a few more requirements. To get the exact version numbers that I used for this article, I recommend installing these directly via the requirement.txt from the GitHub repository:
conda create -n superres python=3.8
conda activate superres

pip install -r https://raw.githubusercontent.com/rasbt/srgan-lightning-blog/main/part1-code/superres-local/requirements.txt?token=GHSAT0AAAAAABUUA7E3SBDECAJWVHD7AHC2YVKLPJA
Now, we should be all set, let’s run our app and see if works:
lightning run app app.py
(To try the App locally on your machine, I recommend getting the files from the GitHub repository.)
Next: Deploying the App on the Cloud
In this article, we explored the core components of the Lightning Framework and built our first Lightning App. Running a Lightning App locally is only half of the fun. Lightning really shines by providing us with super easy access to cloud computing resources for sharing the App – and even training the model if you like. Stay tuned for the next article!
PS: If you don’t want to wait, just run
lightning run app app.py --cloud
and see the magic happen.
Read Next
 Sharing Deep Learning Research Models with Lightning Part 2: Leveraging the Cloud
Deploys a Super Resolution GAN (SRGAN) app to the cloud with Lightning.ai — covers containerization, model serving, and production deployment steps.
Sharing Deep Learning Research Models with Lightning Part 2: Leveraging the Cloud
Deploys a Super Resolution GAN (SRGAN) app to the cloud with Lightning.ai — covers containerization, model serving, and production deployment steps.
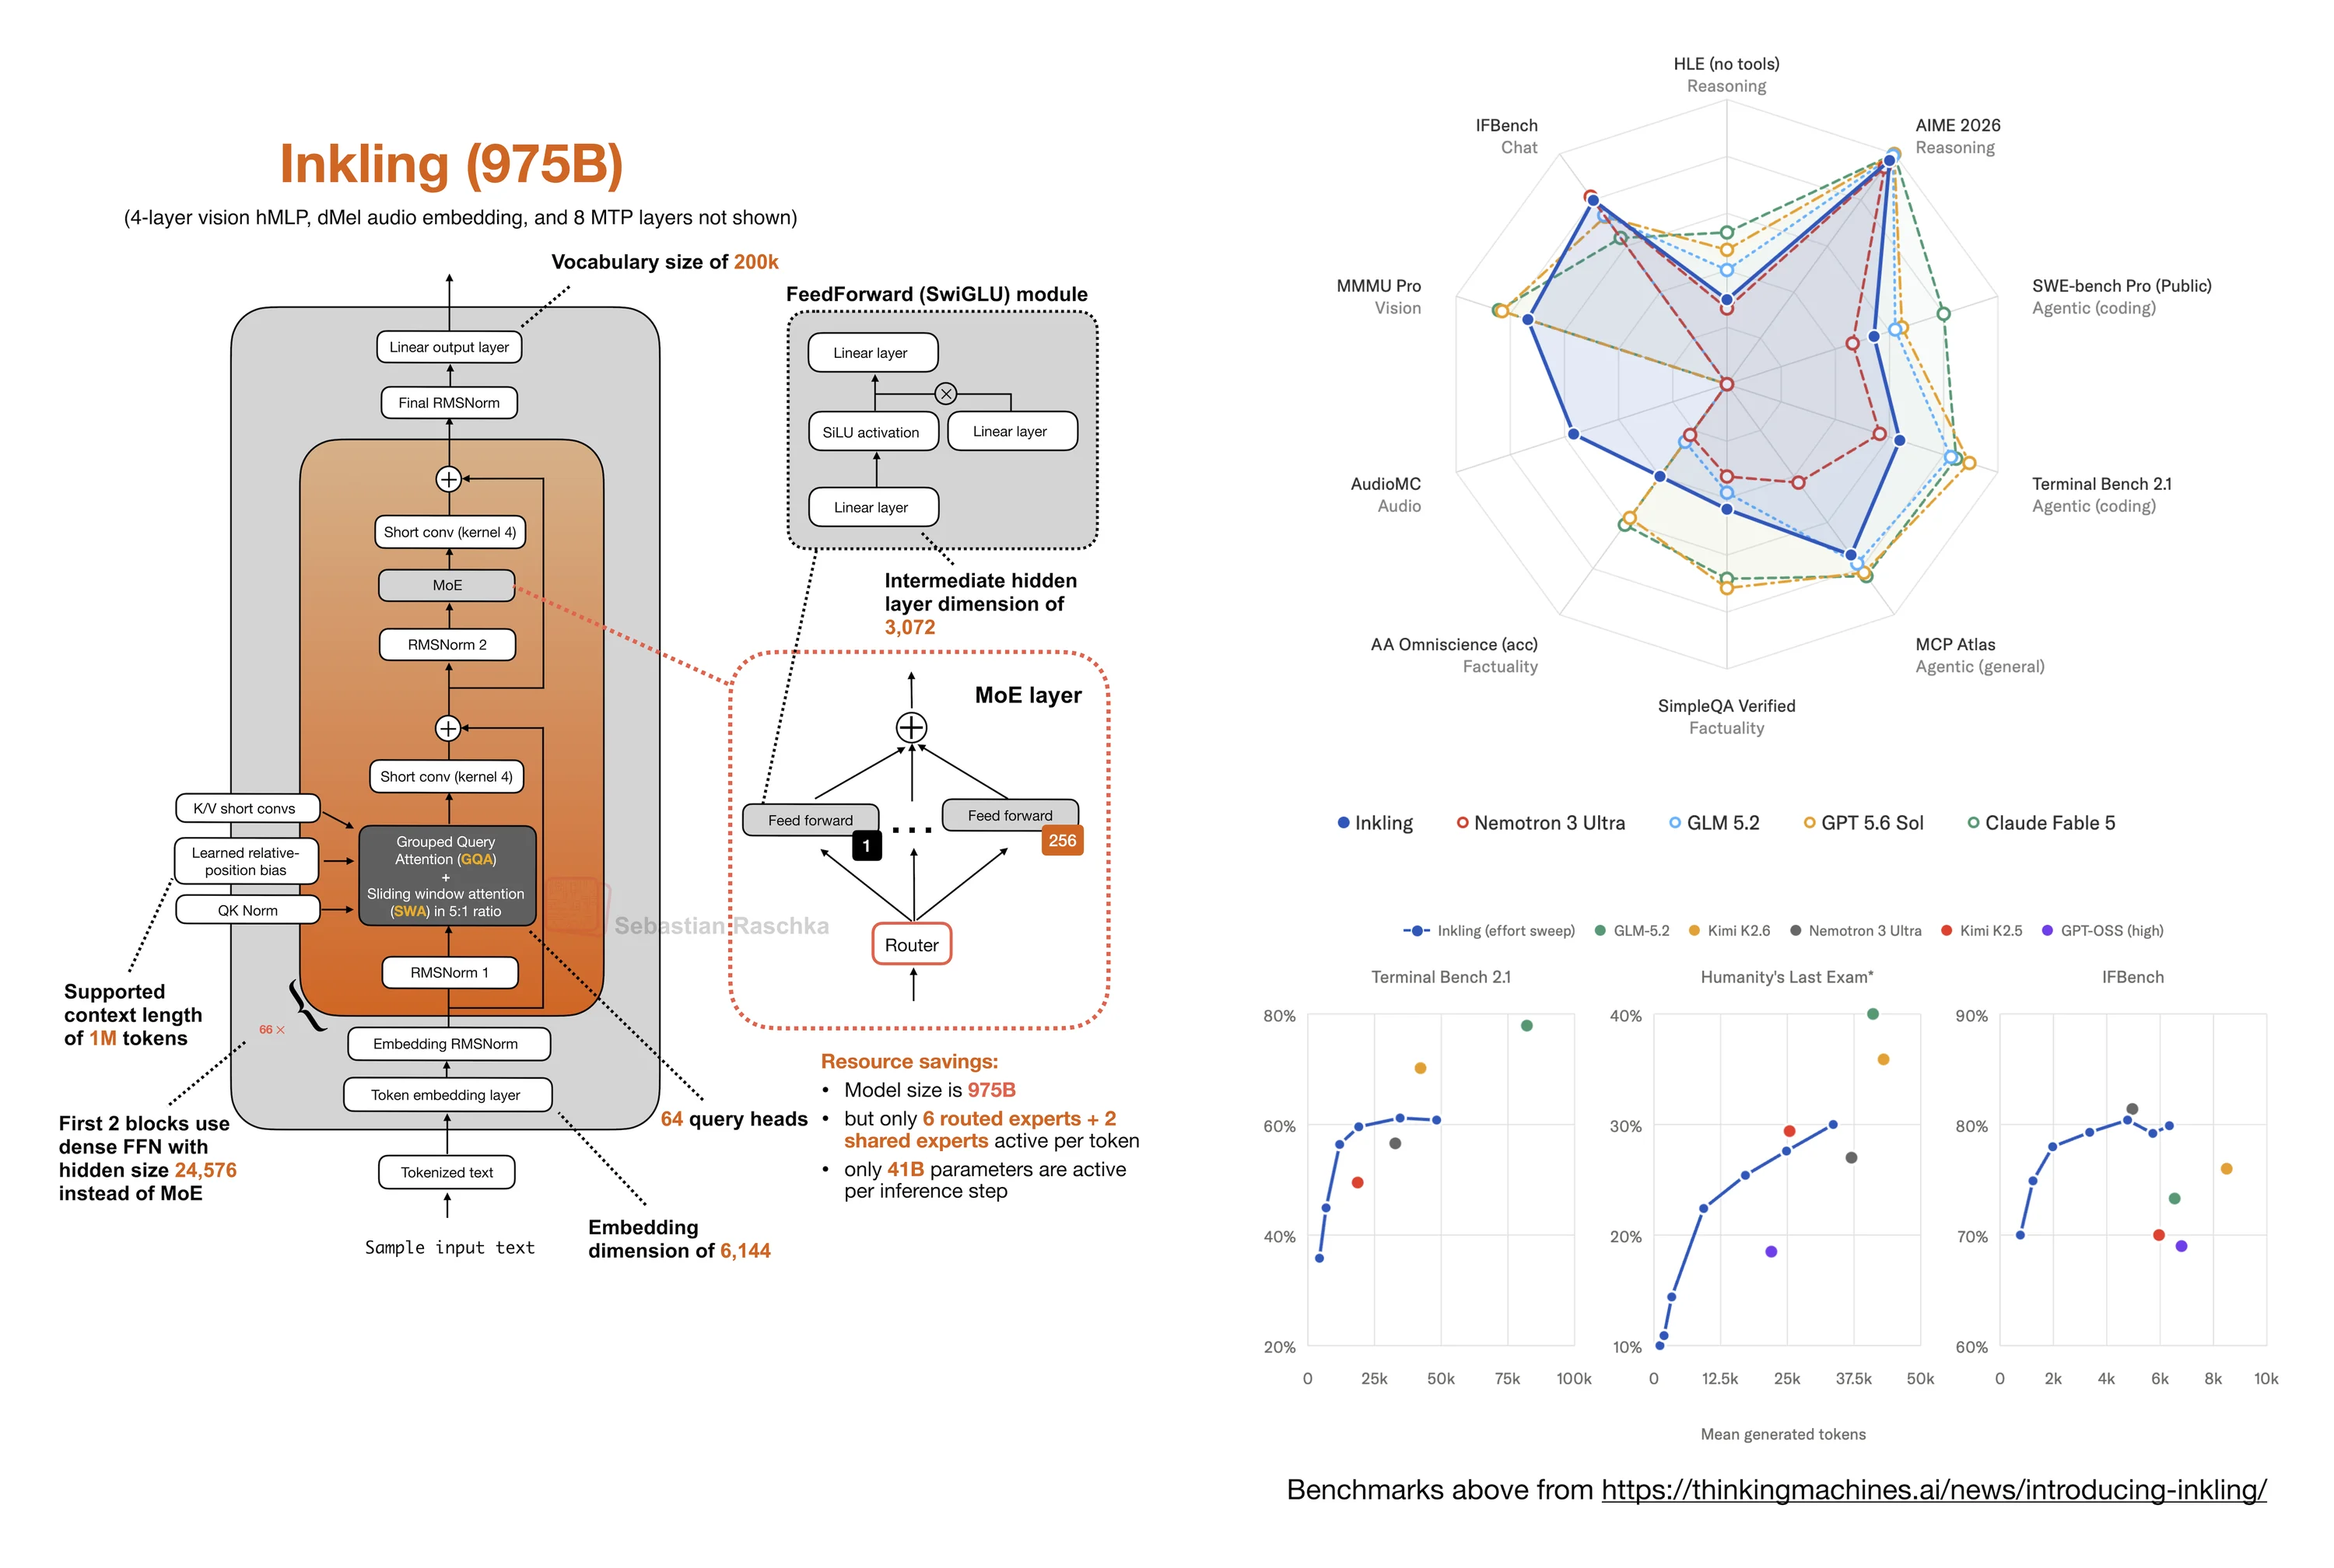 Inkling: A New Open-Weight 975B MoE with a Few Surprises
Short note on Thinking Machines Lab's 975B Inkling open-weight model, its benchmark profile, sparse MoE design, short convolutions, embedding RMSNorm, and
Inkling: A New Open-Weight 975B MoE with a Few Surprises
Short note on Thinking Machines Lab's 975B Inkling open-weight model, its benchmark profile, sparse MoE design, short convolutions, embedding RMSNorm, and
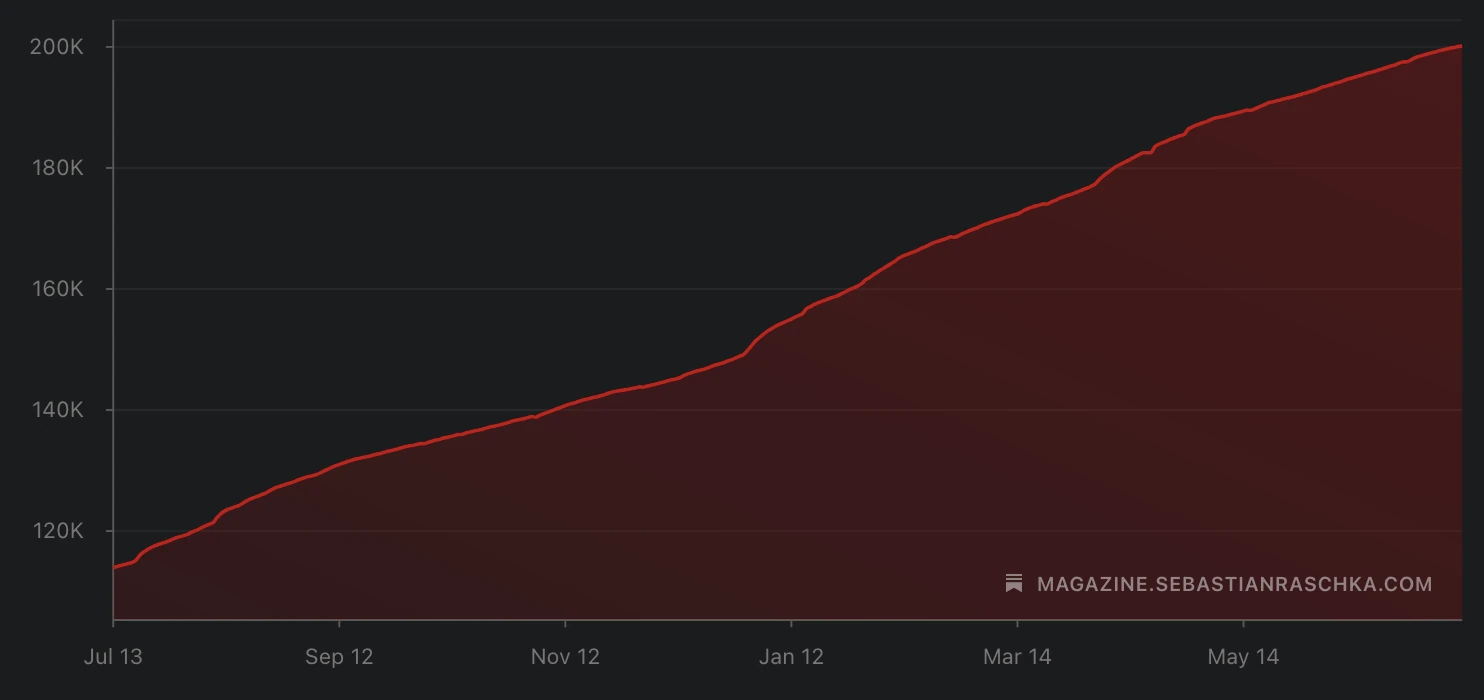 200,000 Subscribers
Short note celebrating Ahead of AI reaching 200,000 subscribers.
200,000 Subscribers
Short note celebrating Ahead of AI reaching 200,000 subscribers.

If you read the book and have a few minutes to spare, I'd really appreciate a brief review. It helps us authors a lot!
Your support means a great deal! Thank you!